Normale Ansicht

An Impossible War: The First Carlist War in the North, 1834-1838 from Bellica Third Generation – Action Point 5

Von: Grant
08. Juli 2026 um 14:00

An Impossible War: The First Carlist War in the North, 1834-1838 from Bellica Third Generation is a block wargame that recreates the First Carlist War in the North of Spain which was a civil war between the Carlists who supported the succession of the late king’s brother Carlos de Borbón and the progressive and centralist supporters of the regent Maria Christina acting for Isabella II of Spain who were referred to as the Liberals. The game uses blocks representing units but also includes counters and uses cards. I was able to play the game about a month or so ago with Francisco Ronco who owns the publishing company Bellica Third Generation and very much enjoyed the game and how it represented this interesting struggle.

In Action Point 1, we took a look at the Game Map, discussing the point-to-point movement configuration, the various spaces and the delineation of the Carlist versus the Liberal Zones, as well as explained the use of the Rest of Spain smaller map. In Action Point 2, we examined the units available to both sides and covered the importance of Supply. In Action Point 3, we took a closer look at the Carlist Uprising Phase and what it means for the game. In Action Point 4, we examined the activation system and the use of Action Point Markers. In this Action Point, which is the conclusion to the series, we will take a look into how Battles work, focusing on the tactical aspect of combat with the use of the Battle Board.

Battle

One of my favorite parts of the game is the Battle mechanic. With Battle, I very much enjoy the use of the Battle Board but also like that there are several different types of combat. Battles focus on asymmetric combat rather than massive open field engagements and are typical of the First Carlist War. These Battles boil down to 3 primary types including Skirmishes, Battles and Assaults and each type have their benefits and uses and one of the important things about the game is the need to learn their best uses and then how to perform them. If both sides have at least 3 Infantry or Cavalry units in a contested space, then there is a Battle. Also if 1 or both sides has less than 3 Infantry and Cavalry units in the space, or only has Cavalry units, then there will be a Skirmish. And finally, in order to launch an Assault on a Fortress, the besieging player must have a Field Artillery unit of any value in the enemy Fortress space.

But before we take a look at these different types of Battle, I want to cover the Combat Cards. Combat Cards provide background events and assist tactical maneuvers without running the game on their own. Each player holds a distinct 36-card deck (Liberal or Carlist) representing historical, operational, and tactical modifiers. These cards simulate unpredictable elements, like sudden skirmishes, political shifts, or logistical hurdles. The Liberal Player generally leads larger, but lower-quality forces plagued by supply issues. Their Combat Cards tend to focus on maintaining order, quelling uprisings on the Rest of Spain Map and chasing Carlist expeditions. The Carlist Player will command smaller, high-quality troops. Their Combat Cards focus on exploiting superior mobility, terrain knowledge, and sudden strikes. Since this is an “impossible” war featuring guerrilla tactics, siege warfare, and frequent skirmishes rather than massive battles, the cards adapt to these asymmetric scenarios.

There are 3 types of cards found in the decks, including Event Cards, Operational Cards and Tactical Cards. Event Cards are played immediately when drawn and provide both positive and negative benefits to the players. Operational Cards can be played when the conditions stated on the card are met, during the player’s own Player Phase or sometimes during the opponent’s Player Phase. Tactical Cards can be played in combat as stated on the card. Each player can use a maximum of one tactical card in each Skirmish, Battle Round or Assault Round.

At the beginning of a player’s Player Phase each Turn, that player will take the top card from their draw deck. If it is an Event Card then it is applied immediately. If it is not an Event Card, the card is kept in the hand so that the other player cannot see it. A player can have up to 8 cards in their hand and these can be played as indicated on the card itself.

These cards are very well done and keep the game very interesting and tense as you just don’t know what type of cards your opponent has that they can spring on you in combat. These cards alter the conditions of the battle and cannot be planned for but must be kept in mind as players enter conflicts. From adding defenses that absorb hits (such as the Stone Walls Tactical Card) or provide additional Effectiveness Rating to units in battles when they are firing (such as the False Retreat Card), these cards make a difference and keep the game feeling like a game.

Now that we have looked at the cards, let’s now take a quick look at the various forms of Battle. A Skirmish consists of just 1 single round of fire. First the defender will fire and applies all hits to the attacking units, then the attacker will fire and applies hits to the defending units. There are no morale rolls in the game. In a Skirmish a player fires with a maximum of 3 Infantry and Cavalry units. The player must choose which units will fire with several limitations. maximum of 1 Cavalry unit in rough terrain and a maximum of 2 Cavalry units in open terrain.
A player always fires with all Artillery units.

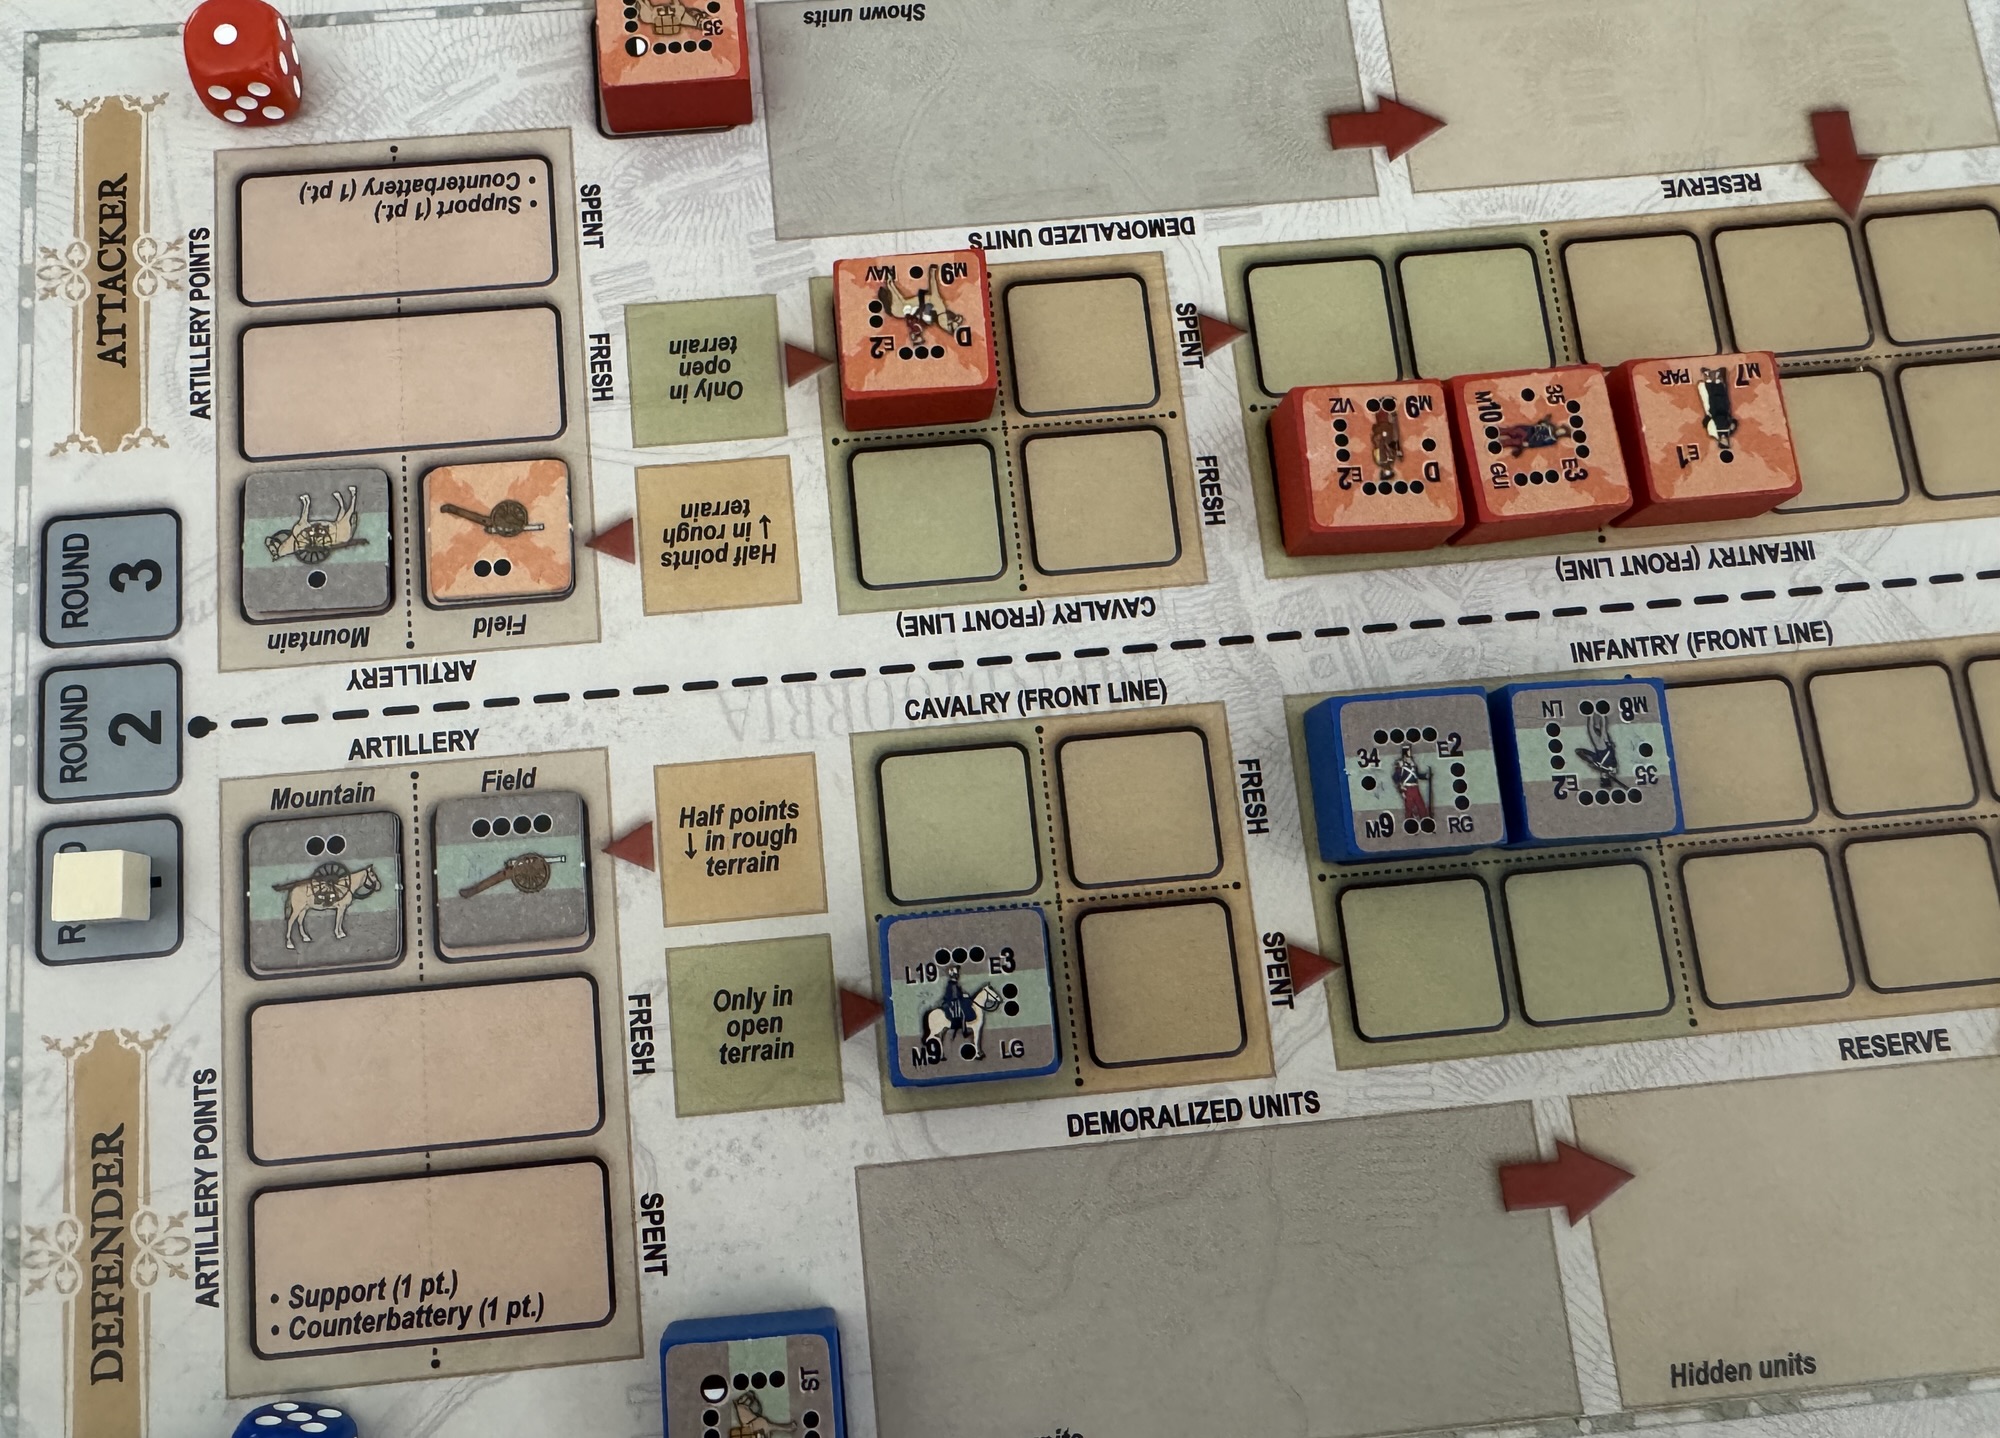
The Battle Board operates as a dedicated, zoomed-in tactical area where the details of combat are resolved. When opposing blocks meet on the main strategic map, units are moved to this board to fight out the encounter safely separated from global troop movements. When a Battle begins, players move their hidden army blocks from the main map onto the Battle Board. Depending on the terrain where the battle takes place (such as rough terrain for a city or plains for the countryside), players deploy their units into specific zones on the board. The Flanks are outside positions that trap or outmaneuver the enemy. The Front Line are the units taking the direct hits and dealing the damage to the enemy and the Reserve is where extra units are kept on standby to join the battle as losses are suffered.

Combat on the Battle Board happens in rounds. As a block wargame, the number of dice rolled by any unit is based on the number of pips shown on the block and the to hit number is equal to or less than their Effectiveness Rating printed on the block. Modifiers may be added from terrain or from the play of Combat Cards. Dice are then rolled and hits are determined with the defending units taking losses by reducing their pips by rotating the block counterclockwise. It is as simple as that.

The big difference in the types of Battle are the duration. A Skirmish last only 1 round while a Battle can last up to 3 rounds. The Battle ends immediately when 1 of the following situations arises. If the Battle lasts the full 3 round, when the 3rd Battle Round ends the defending player remains in the space and the attacking player retreats. There is no Rout or Pursuit A player has no Infantry units in the front line. The other player wins,
gains 1 VP, and causes a Rout by the losing side, which will then retreat. Or, a player decides to retreat voluntarily in the End of Battle Round phase. The other player wins and can carry out Pursuit.

The Battle mechanic in An Impossible War captures perfectly the frustration of asymmetry in both competing sides and their troops. The name of the game is specifically reference to the the Liberals’ massive, clunky numbers versus the Carlists’ nimble, guerrilla style of warfare. 2 different armies with 2 different philosophies has created a situation where neither side can feel comfortable with the war and their chances at winning it. I frankly think that the designer David Gómez Relloso did an exceptional job at creating this asymmetry and creating a highly playable and engaging game. If you didn’t know, I chose to add An Impossible War to my Top 10 Wargames of 2025!. It landed at #8 on the list, and probably would have scored higher had I had a chance to play the game further and experience all of the parts of the design.

If you are interested, we posted an interview on the blog with the designer and you can read that at the following link: https://theplayersaid.com/2025/07/14/interview-with-david-gomez-relloso-designer-of-an-impossible-war-the-first-carlist-war-in-the-north-1834-1838-from-bellica-3rd-generation/

I also was able to shoot a fairly short video summary of my game play with Francisco Ronco who is the owner of Bellica Third Generation and you can watch that at the following link:

-Grant
Castelnuovo 1539 from Draco Ideas – Action Point 1

Von: Grant
18. Juni 2026 um 14:00

In 1539, a small Spanish garrison of troops numbering 3,500 men held the Albanian village of Castelnuovo for 22 days against the massive Ottoman army consisting of over 54,000 Turk soldiers. This siege took place as a part of the Ottoman-Habsburg struggle for control of the Mediterranean Sea in July 1539 at the walled town of Castelnuovo, which is the location of present-day Herceg Novi, Montenegro. After days of open trench warfare and more than a month of smaller combats, skirmishes, assaults and bombardments from the Turkish navy, the last Spanish defenders fell ending the siege. Castelnuovo 1539 is a wargame that focuses on this siege designed by Francisco Ronco. The defenders are safe behind sturdy walls and battlements but time and continual shelling from the Ottomans will lead to assaults over the walls. The battle is hopeless for the defenders but they can win the game by doing enough damage to the Ottomans to end their campaign and stop them from invading further into the Albania and then onto Spain and the rest of Europe. The game is very well produced using wooden blocks for soldiers, stylized walls, siege trenches and cannon along with ships and the board is also beautifully illustrated. The game is a block wargame where the strength of units are hidden from the opponent and plays pretty quickly in less than 90 minutes and really is a great representation of the battle and its history.

In this series of Action Points, we will first take a look at the beautiful Game Board and its area movement scheme, examine the units available to both sides and compare their relative strengths and weaknesses, take a look at the 5 different types of Command Cards and discuss how they are used, look at the 2 different types of rounds including a Siege Round and an Assault Round and how they differ, take a look at an example of combat and bombardment and finally examine the victory conditions for both sides and how casualties effect this outcome.

Game Board

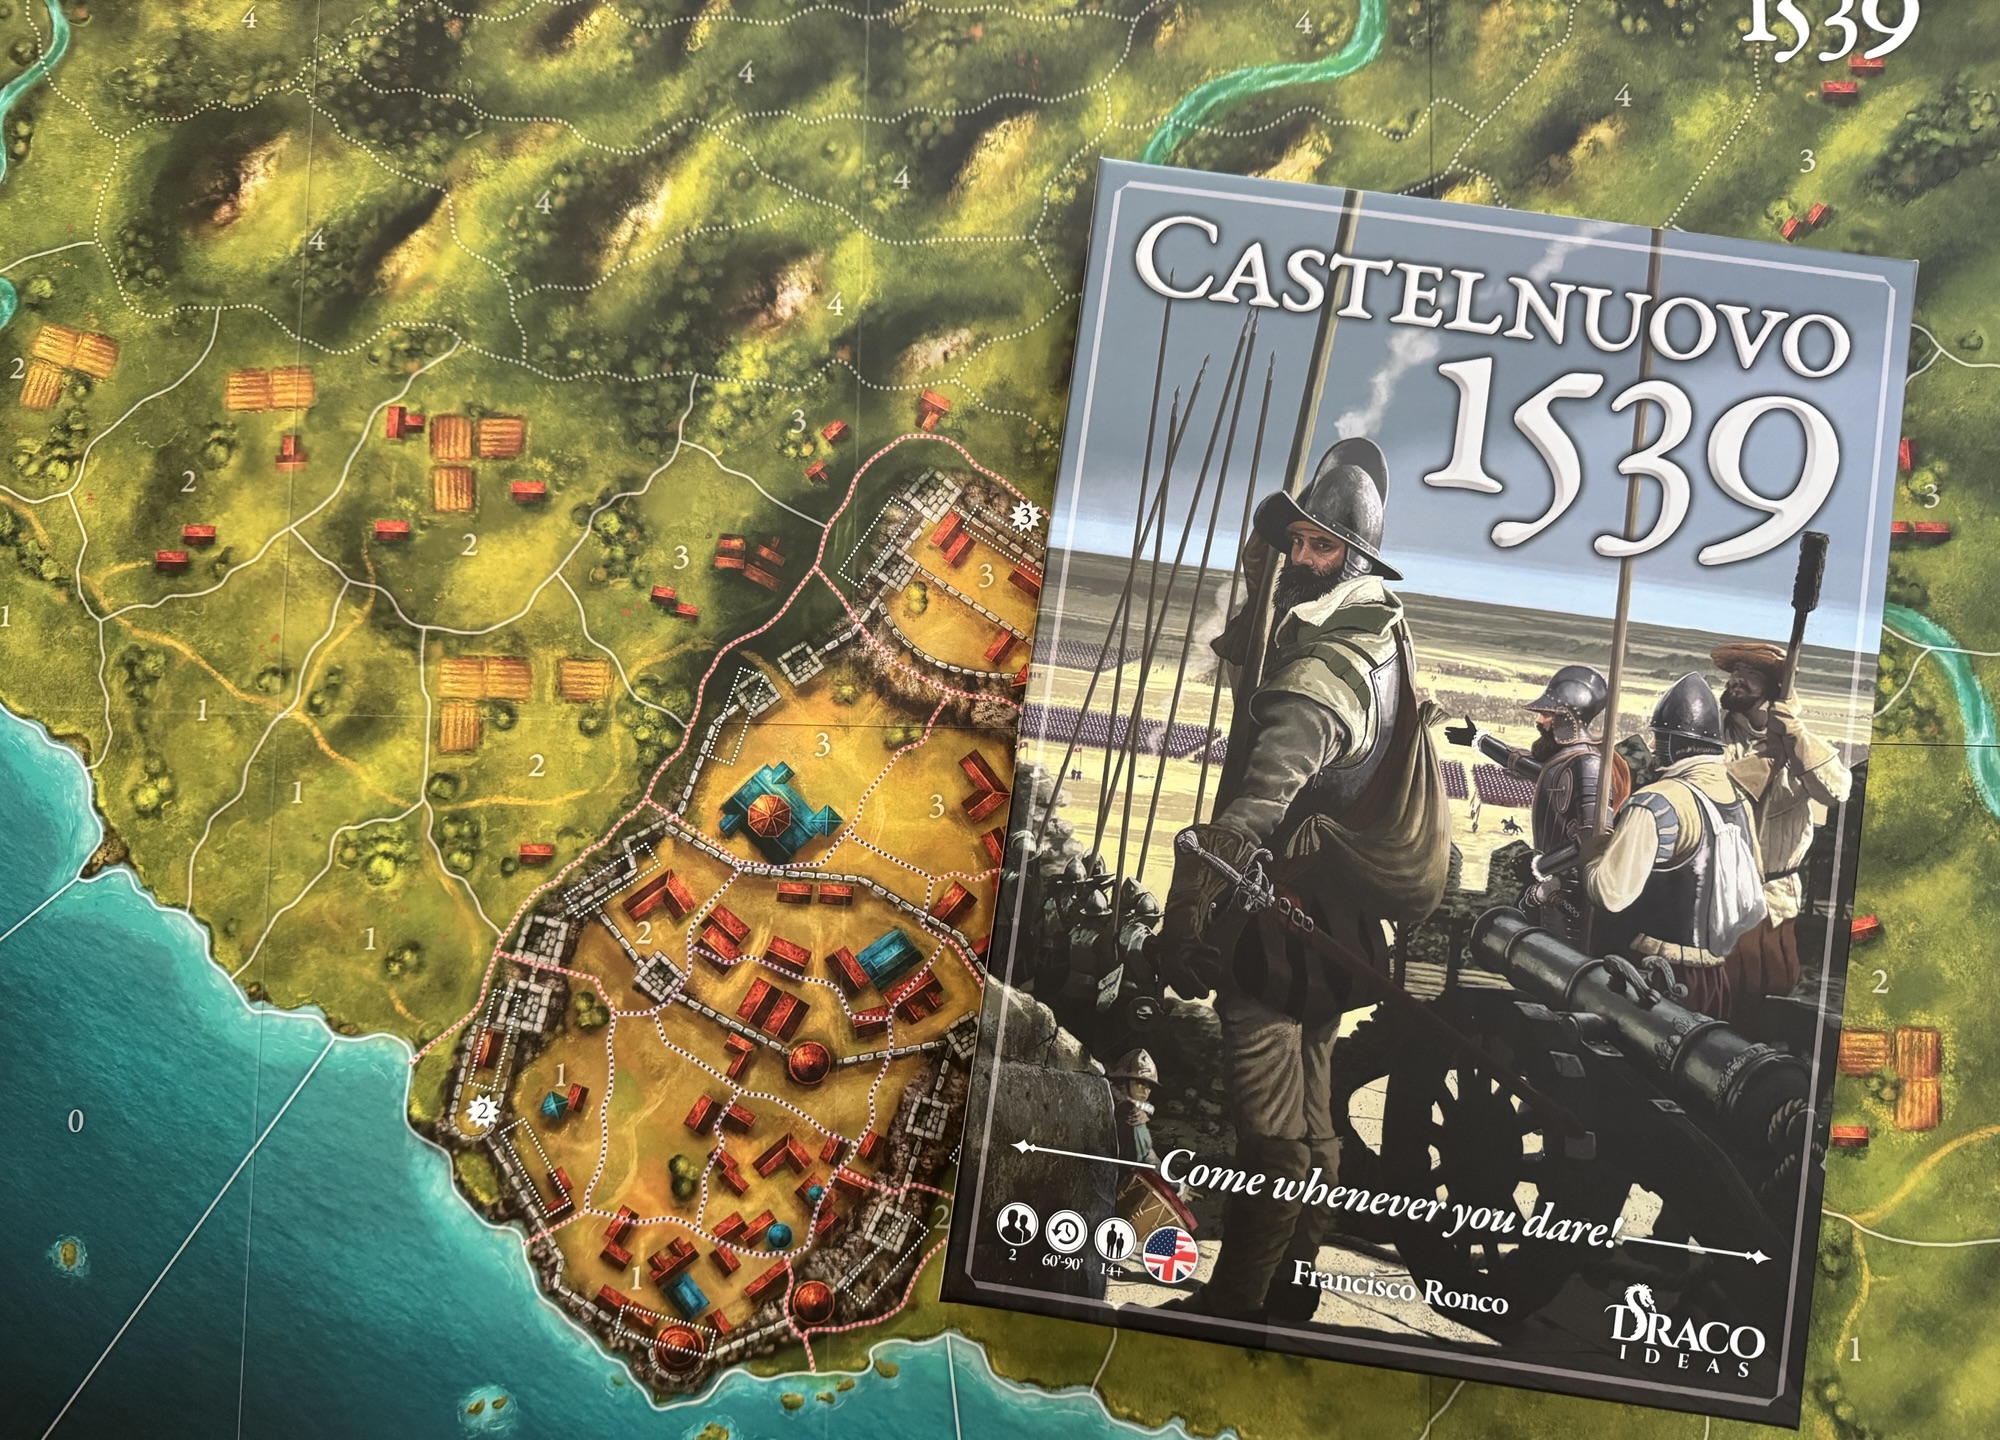
The Game Board represents the fortified city of Castelnuovo and its surrounding areas, including the Mediterranean Sea to the south and the rolling countryside to the north. The Game Board is divided up into areas which are used to regulate the movement and positioning of the block units. The Game Board is pretty large really measuring in at 29″ x 21″ and is a fully mounted map board and is very nicely illustrated by Paco Arenas and absolutely was a joy to play on.

As you look at the Game Board in the picture above you will notice a few things. The areas of the city of Castelnuovo are outlined in red with a dotted line representing the city walls around its perimeter. There are also 4 inner areas of the city itself outlined in purple. Sometimes the game rules make reference to the “Fortress”, which means the 4 areas of the city and the walls surrounding them.

Here is a closeup of the Fortress where you can see the colored lines a bit better. You will also notice that there are rectangular boxes on top of the walls in the Fortress outlined with white dotted lines. These are spaces where the wooden wall segments are placed to represent the Resistance Level of the walls. You will see that in each area of the city that has walls, there is a number found in a white star that represents this Resistance Level. There are areas with both Resistance 1, 2 and 3 inside the Fortress. As the walls are attacked with bombardments from artillery, their Resistance Level will be degraded represented by placing wooden cubes in each area marking the current Resistance Level with 1, 2 or 3 cubes. If an area has 3 Resistance Level and takes a hit, the player will remove one wooden piece indicating that the Resistance points have dropped. Once the Resistance Level reaches 0, the walls are destroyed and the wooden wall pieces are removed from the board. The Ottoman player may then storm the walls and attack the defending units in the city.

There are 2 types of terrain found in the countryside of the Game Board with clear terrain being shown by a solid white outline and rough terrain outlined by a white dotted line. Each area of the map has a Height Level value printed in its location, which indicates the height of the area. The heights are 0 being the lowest, or basically the sea level with a 4 being the highest which represents a mountain level. The height effects the shooting of firearms. In addition, other terrain features are printed on the Game Board including the coastline, which separates the sea areas from the land areas, and also is a landing point for a majority of the Ottoman player’s reinforcement troops. Also, the 3 areas with Resistance Levels of 2 and 3, marked with the white star, are the areas that the Ottoman army must occupy at the end of any round to win the game.

Movement is specifically tied to the type of lines found in the areas of terrain. Units and Leaders can move by playing Action Cards, which allow a group of 1 to 3 units that are in the same area to one or more areas. Activated Infantry units will have 2 movement points and Cavalry have 4 movement points. Moving into a clear terrain area costs 1 movement point while moving into a rough terrain area, which is marked with white dotted
lines will cost 2.

The countryside areas have various depictions of buildings including shacks, storage sheds, houses as well as farm fields. These buildings do not affect combat or movement and are simply illustrative of the surroundings of the city. They are also many trees and bushes drawn on the Game Board with connecting roads also shown.

There are a few pieces that the players will place on the Game Board at the outset of playing including the wall blocks already mentioned as well as the Bastions. These Bastions are used by the Spanish player and are placed at the beginning of the game in any terrain areas outside of the city proper. These Bastions function similarly to the walls of Castelnuovo’s fortifications. Once these are placed, they cannot be moved and will remain on
the board even if their Resistance drops to 0 and they are destroyed. The Ottoman player can destroy them with artillery Bombardments or by spending Trench Points from Command Cards when entering them. These Bastions do not provide defense to the Ottoman player.

The Casualty Track is printed in the bottom left hand corner of the Game Board and is used to keep track of the number of blocks lost by the Ottoman player. In addition, also tracked will be Leaders and the number of Assault Rounds used by the Ottoman player.

The game really is a nicely made production with the Game Board being one of the best parts of the package. It is clear, well laid out and takes little to no time to understand its locations and areas. I think that one of the strengths of this game is that it is not only nicely produced but the rules are very clear and the strategy of what each side should be doing, by taking advantage of their defenses and the terrain.

In Action Point 2, we will examine the units available to both sides and compare their relative strengths and weaknesses.

-Grant

An Impossible War: The First Carlist War in the North, 1834-1838 from Bellica Third Generation – Action Point 4

Von: Grant
11. Juni 2026 um 14:00

An Impossible War: The First Carlist War in the North, 1834-1838 from Bellica Third Generation is a block wargame that recreates the First Carlist War in the North of Spain which was a civil war between the Carlists who supported the succession of the late king’s brother Carlos de Borbón and the progressive and centralist supporters of the regent Maria Christina acting for Isabella II of Spain who were referred to as the Liberals. The game uses blocks representing units but also includes counters and uses cards. I was able to play the game about a month or so ago with Francisco Ronco who owns the publishing company Bellica Third Generation and very much enjoyed the game and how it represented this interesting struggle.

In Action Point 1, we took a look at the Game Map, discussing the point-to-point movement configuration, the various spaces and the delineation of the Carlist versus the Liberal Zones, as well as explained the use of the Rest of Spain smaller map. In Action Point 2, we examined the units available to both sides and covered the importance of Supply. In Action Point 3, we took a closer look at the Carlist Uprising Phase and what it means for the game. In this Action Point, we will take a look at the activation system and the use of Action Point Markers.

Activation System

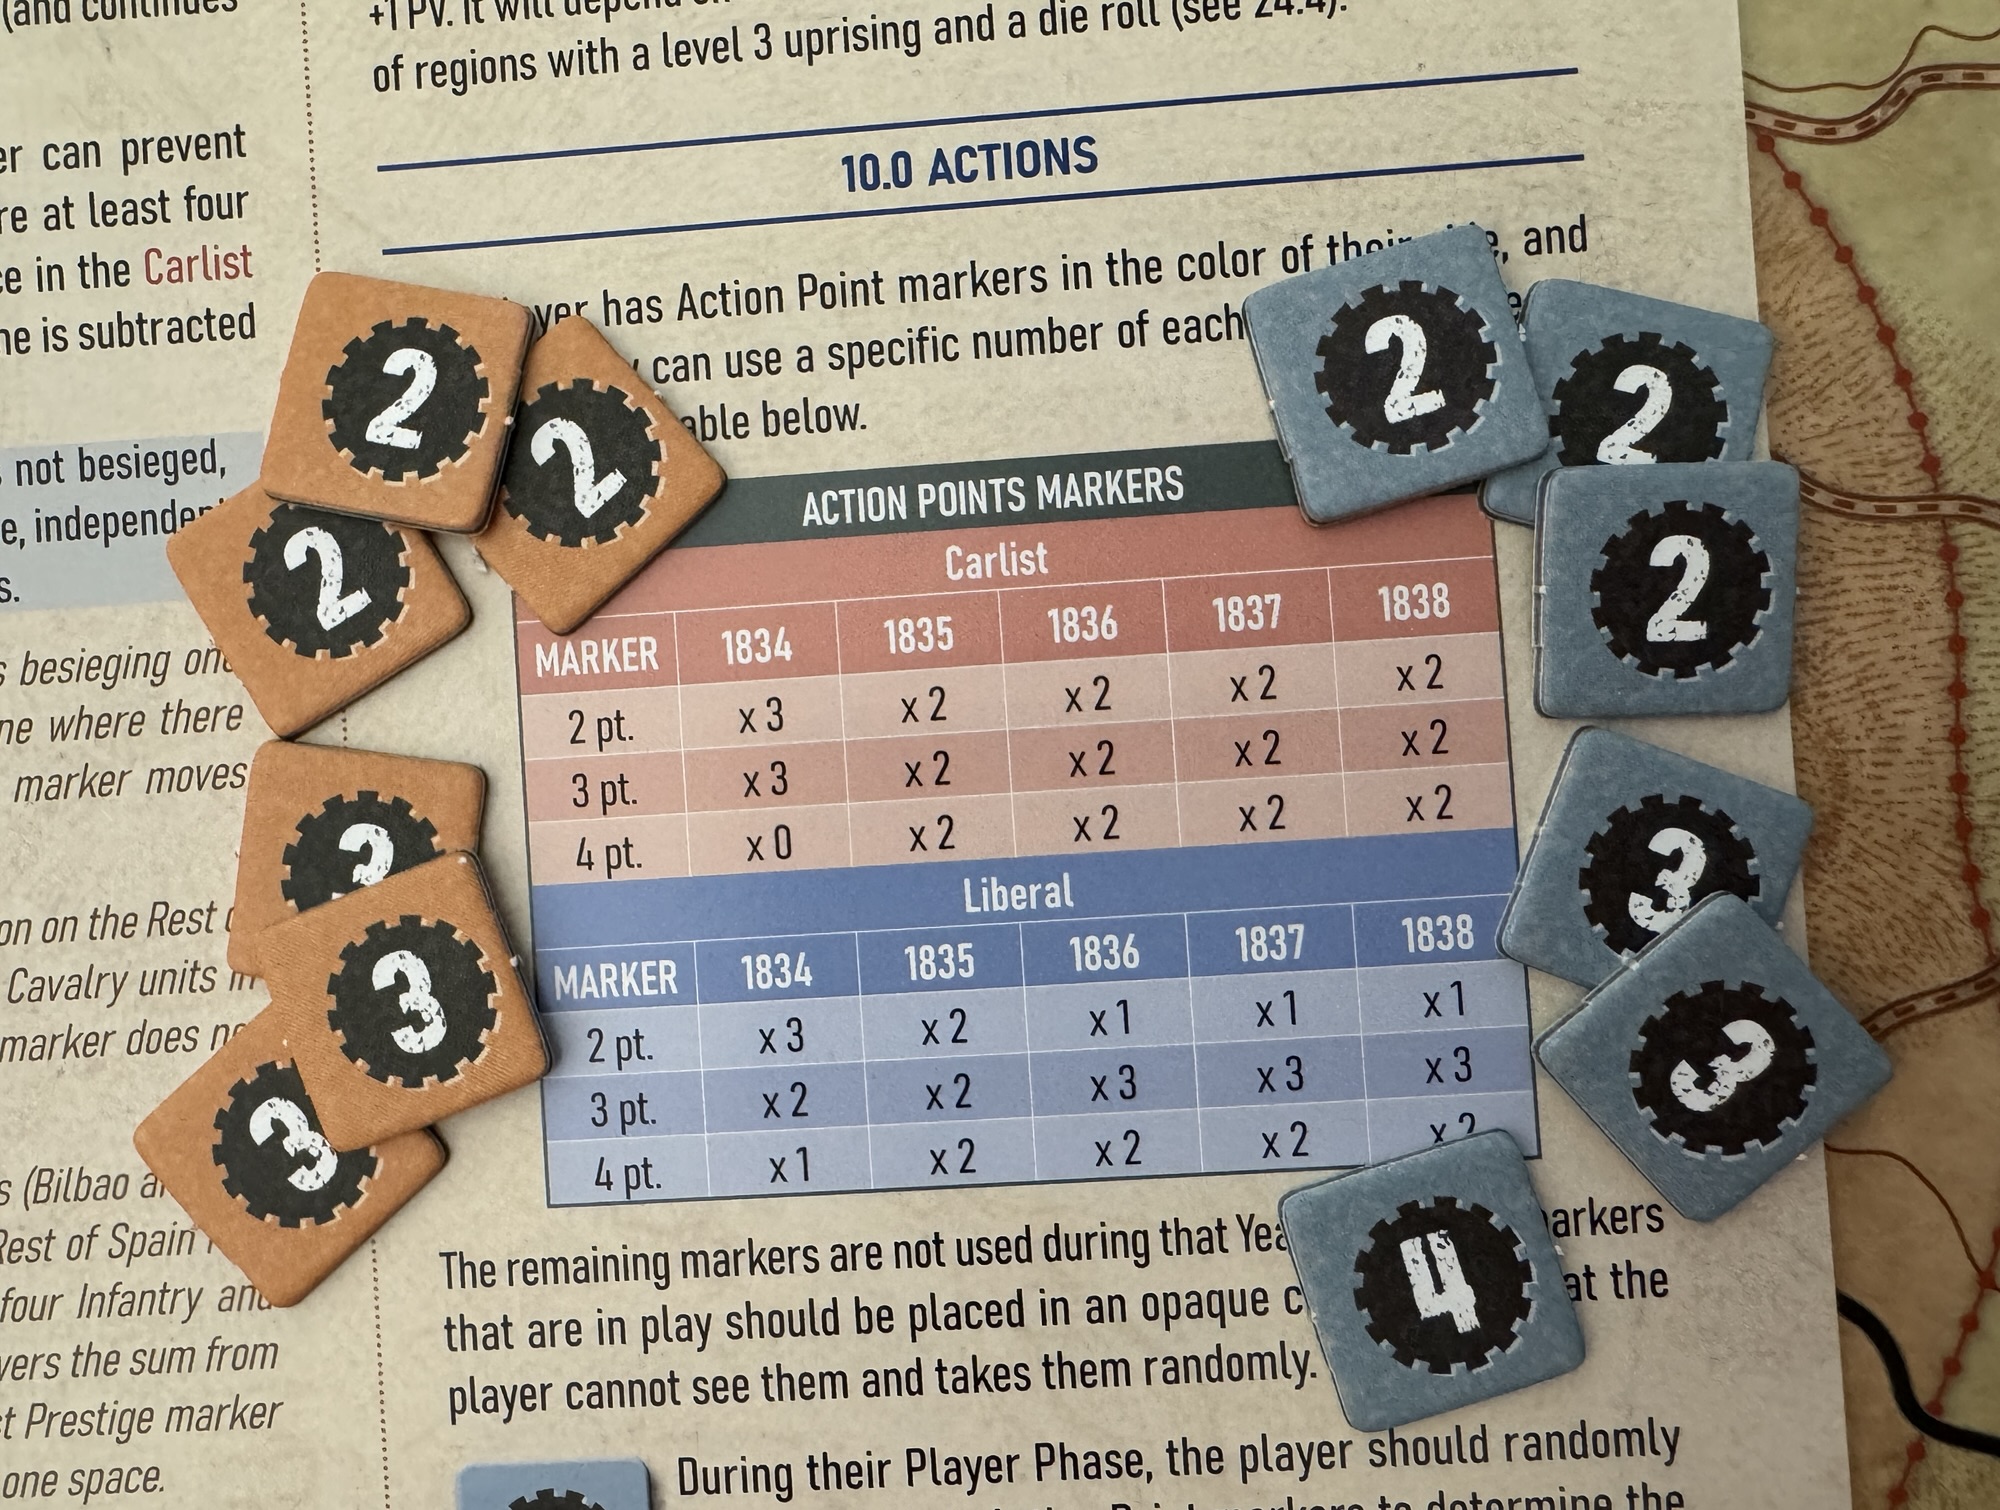
The main focus of the activation of units is the concept of Action Points. These Action Points are used to take various actions such as to activate units for movement, build fortresses, destroy enemy fortresses, obtain replacements, recruit units into Expeditions, suppress uprisings and enter into combat as a part of activation for movement. Both the Carlist and Liberal player has Action Point Markers in the color of their side and each year they can use a specific number of each value of marker. This is determined at the outset of each year according to the Action Point Marker Table.

After the number of Action Point Markers used is determined, the players will each build a chit draw cup for their own Action Point Markers. This should be an opaque container that obscures the identity of each marker as the draw is supposed to be random and is really part of the fun of the design. Then at the start of their Activation Phase, the player will randomly draw an Action Point Marker and then mark their Action Point Track accordingly. As already mentioned, these Action Points are the “fuel” spent to perform actions.

As you can see in the chart above, each year the players both have access to the same amount of overall Action Point Markers with 6 but the makeup of these markers will be different ranging from 2 points to a maximum of 4 points. For example, in 1834 the Carlist player will have three 2-point markers and three 3 point markers while the Liberal player will have access to three 2-point markers, two 3-point markers and one 4-point marker. This is an interesting point as the Liberal player has the potential to obtain more Action Points in 4 of the 5 years covered in the game. This is random of course and fate can decide that the Carlist player will get the most Action Points each year but the potential is there for the Liberal player to have the advantage.

As mentioned, these Action Points are the currency used to take various actions and in most instances they will be used to Activate units on the board. Activated units can then move and their movement allowance will depend on how many units move together and the roads used, either main or secondary.

But one of the more interesting ways that Action Points can be used is to convert them into Command Points. The player may choose to convert as many Action Points as desired each year into Command Points, noting them on the Command Points Track. A player may have no more than 5 Command Points. Command Points are flexible currency that will not be lost and can then be used to contest initiative, as Action Points or even to attempt an interception of enemy units. These Command Points are vital and should be something that players invest into as they are very flexible and also allow for the taking of actions during the other players activation. I like the way the game uses this random activation concept and currency for those actions. In reading the designer notes in the Playbook, the designer David Gómez Relloso emphasized the fact that the war was brutal, difficult and that communication and distribution of orders was very difficult, particularly for the Liberals as they were operating in hostile territory where the locals continually harassed and denied them of provender as they would flee taking their livestock with them to keep them out of enemy hands. This random number of Action Points, and thereby a varied number of points to do things with on the board, really is central to the design and can make for a very interesting challenge for those that are unlucky like me. While the differences in the values of the Action Points are not that far apart, a few extra or less than your opponent can cause great difficulty as you will simply not be able to perform what you need to each turn. This boils down to a prioritization of goals and will lead to some very tough decision having to be made about activating units versus recruitment of new units or focusing on the game board state versus the state of the Rest of Spain Map and the Carlist Uprisings and Expeditions.

If you are interested, we posted an interview on the blog with the designer and you can read that at the following link: https://theplayersaid.com/2025/07/14/interview-with-david-gomez-relloso-designer-of-an-impossible-war-the-first-carlist-war-in-the-north-1834-1838-from-bellica-3rd-generation/

I also was able to shoot a fairly short video summary of my game play with Francisco Ronco who is the owner of Bellica Third Generation and you can watch that at the following link:

In Action Point 5, which is the conclusion to the series, we will cover some examples of Battle, focusing on the tactical aspect of combat with the use of the Battlefield Board, as well as an example of a Siege.

-Grant

An Impossible War: The First Carlist War in the North, 1834-1838 from Bellica Third Generation – Action Point 3

Von: Grant
04. Juni 2026 um 14:00

An Impossible War: The First Carlist War in the North, 1834-1838 from Bellica Third Generation is a block wargame that recreates the First Carlist War in the North of Spain which was a civil war between the Carlists who supported the succession of the late king’s brother Carlos de Borbón and the progressive and centralist supporters of the regent Maria Christina acting for Isabella II of Spain who were referred to as the Liberals. The game uses blocks representing units but also includes counters and uses cards. I was able to play the game about a month or so ago with Francisco Ronco who owns the publishing company Bellica Third Generation and very much enjoyed the game and how it represented this interesting struggle.

In Action Point 1, we took a look at the Game Map, discussing the point-to-point movement configuration, the various spaces and the delineation of the Carlist versus the Liberal Zones, as well as explained the use of the Rest of Spain smaller map. In Action Point 2, we examined the units available to both sides and covered the importance of Supply. In this Action Point, we will take a look at the Carlist Uprising Phase and what it means for the game.

Carlist Uprising Phase

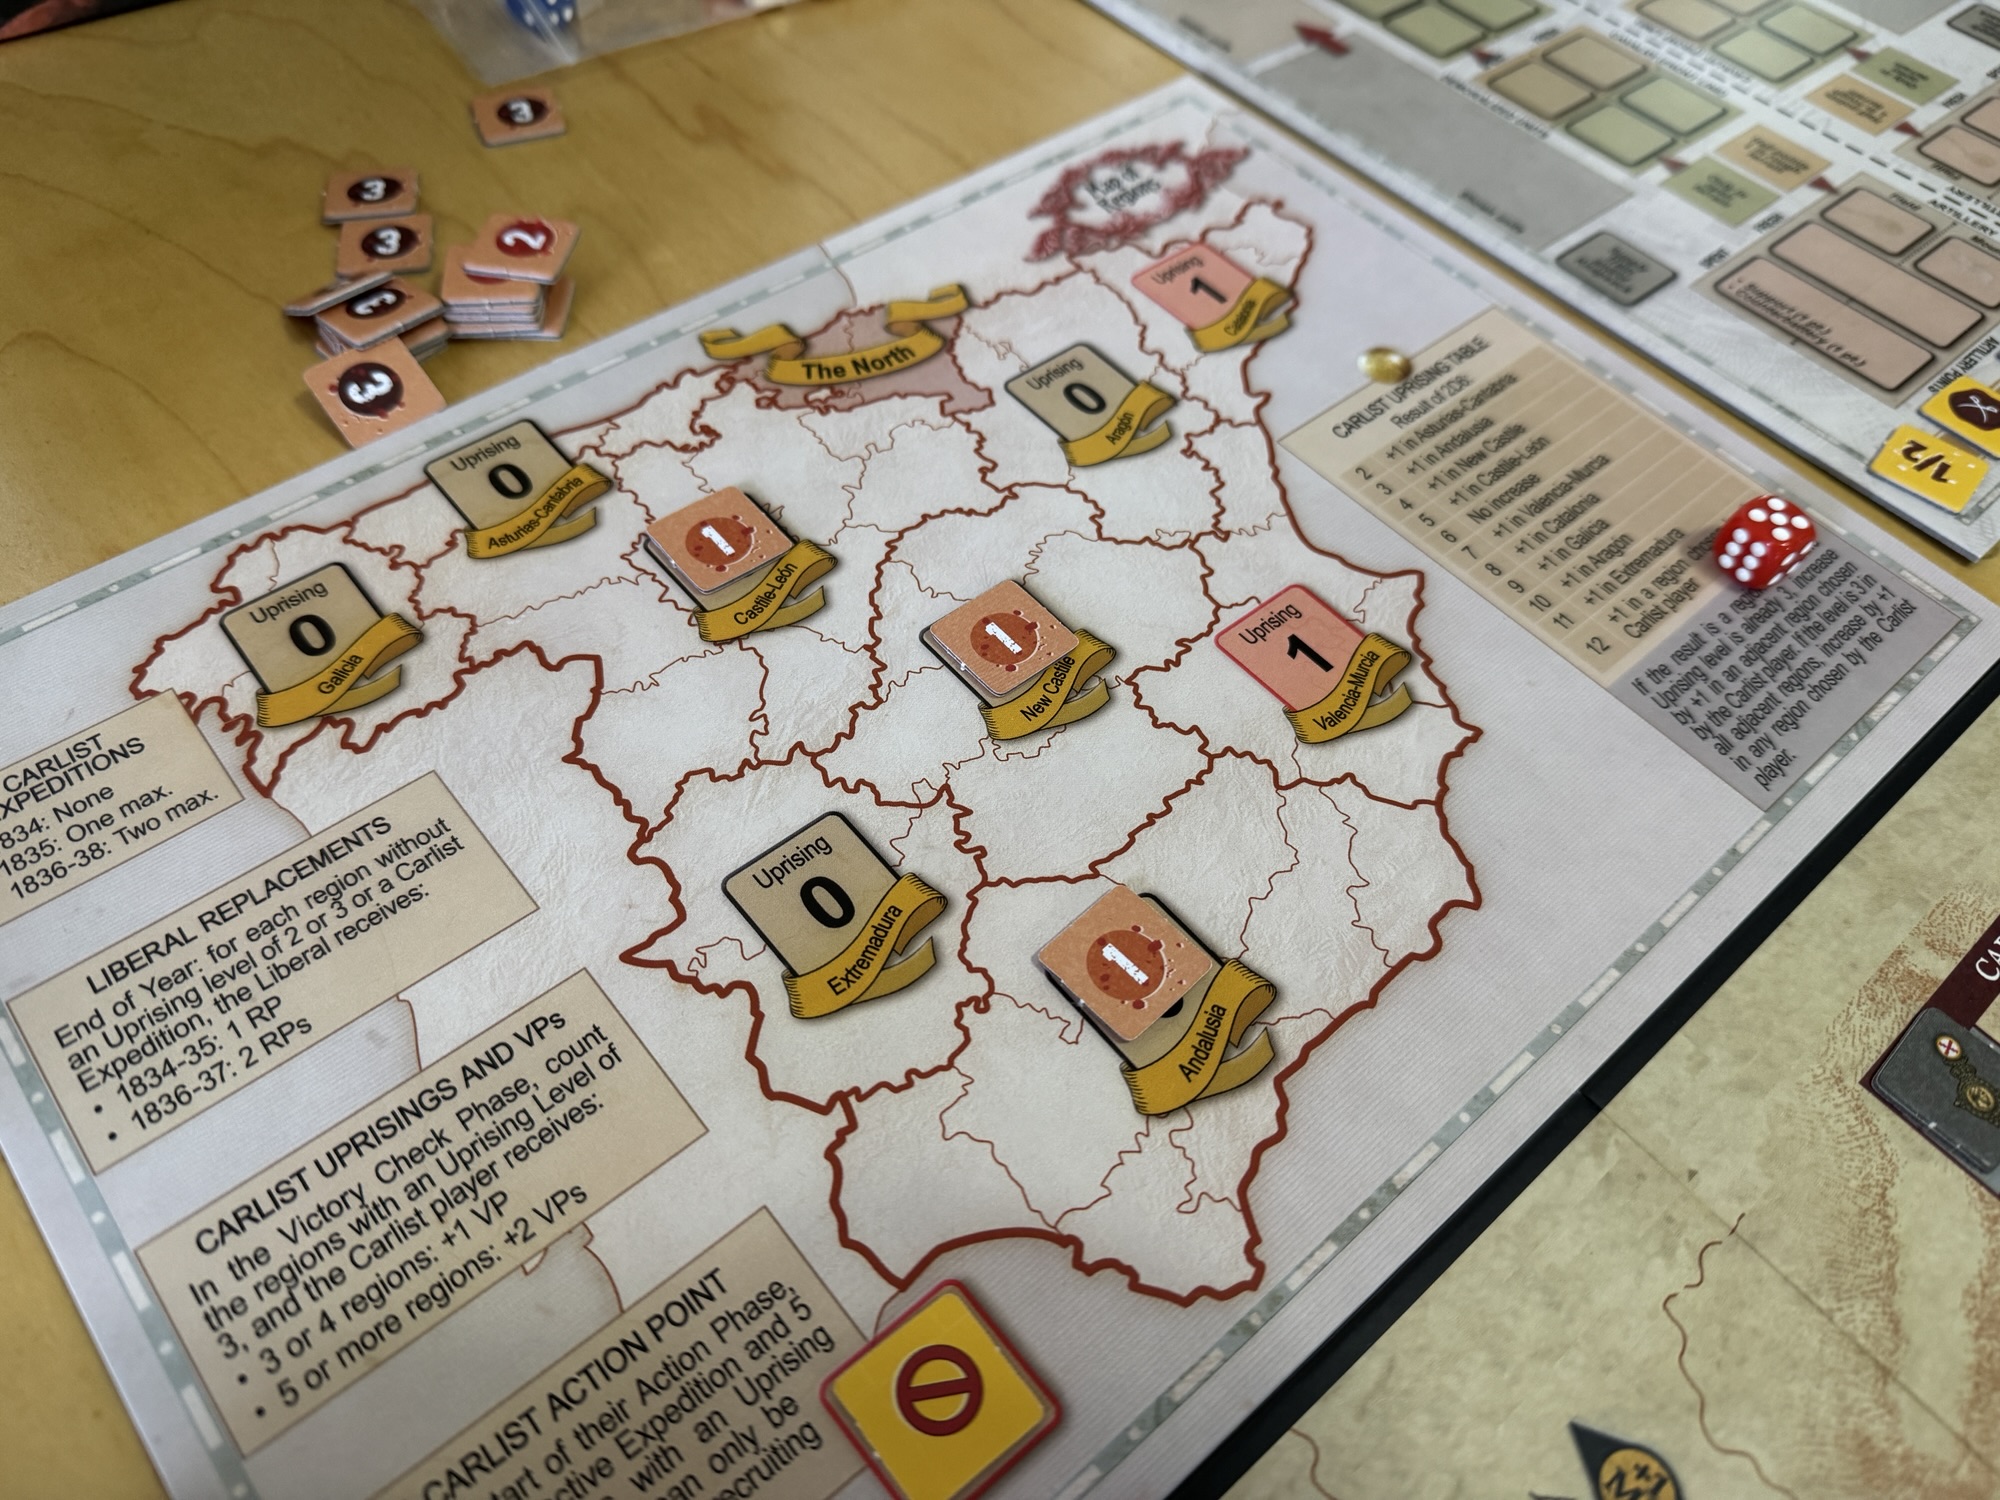
The map of the Regions of Spain, or Rest of Spain Map as it is referred to in the rules, is smaller and simpler than the Game Map itself and is a separate board that plays along side the main board. It consists of 9 large regions that cover large territories of Spain. This map’s purpose is to record the spread of the Carlist Uprisings, to enable Carlist expeditions to operate and for the Liberal player to chase and hunt these expeditions down. The Rest of Spain Map is divided into regions and each region has a Carlist Uprising Level of between 0-3. Also, there are 2 regions, including Valencia-Murcia and Catalonia, where the Carlist Uprising Level cannot fall below 1, reflecting the intensity of Carlism in these regions. The Carlist Uprising Level cannot ever be less than 0 (or less than 1 in Valencia-Murcia and Catalonia which is the printed value on the Rest of Spain Map) or more than 3. Any effects that change the Carlist Uprising Level below or above these numbers is simply ignored.

The Carlist Uprising Phase begins with a roll on the Carlist Uprising Table to determine any effects that will be carried out this turn. Then, if there is an existing active Carlist Expedition on the Rest of Spain Map, the Carlist player may attempt to increase the Carlist Uprising level in its region. This increasing of the Uprising Level is like a wave. A wave that starts out small with presence of unrest being only in a few spaces on the Rest of Spain Map, but it will soon get out of control and turn into a tidal wave that can crush the Liberal player if they have not being paying attention to the situation on the board.

The Carlist player will roll 2D6, sum the result of both of the dice, and then will consult the Carlist Uprising Table found on the Rest of Spain Map to find and then apply the result. If you know anything about the probability of the outcome of this 2D6 roll, the most likely outcome is 7. There are 36 total possible combinations when rolling 2D6 and there are 6 different ways to get to a result of 7 including 1+6, 2+5, 3+4, 4+3, 5+2, and 6+1. So generally your spread will be around that 5-8 range, which according to the Carlist Uprising Table means that you will see the Uprising Level increase in places like Castile-León (result of 5), no increase (result of 6), Valencia-Murcia (result of 7) and Catalonia (result of 8). But it is also important to remember that the highest a region can attain is 3 and if it is rolled then the Carlist player will choose to increase the Carlist Uprising Level in 1 adjacent region.

The next step of this phase is the Expedition portion. If there is any active Expedition on the Rest of Spain Map then the Carlist player can attempt to increase the Uprising Level in each region where there is an Expedition, as long as there are more Carlist units than Liberal units there. The number of Liberal Infantry and Cavalry units in the region is subtracted from the number of Carlist Infantry and Cavalry units forming the Expedition. The Carlist player then rolls a die, and if the result is equal to or less than this number, the Uprising Level increases by +1. An Expedition cannot increase the Uprising Level in a region where the level is already 3 and there is no adjacent spill over of this furor.

The units of the Liberal player can move on this map at all times. The units of the Carlist player cannot enter the Rest of Spain Map before 1835. It is important to keep in mind the Carlist player can only have a single active Carlist Expedition on the Rest of Spain Map in 1835, and a maximum of 2 Expeditions from 1836 onwards.

So why is this part of the game important? Uprisings can provide Victory Points to the Carlist player. In addition to VP’s, Uprisings provide replacements for Carlist Expeditions and feeds the spread of rebellion on the Rest of Spain Map. There is a track on the map where the Carlist player keeps an accounting of the the Carlist Prestige marker to gain VP’s. If the amount of regions with an Uprising Level of 3 is at 3 or 4 regions, the Carlist player will gain 1 VP. If there are 5 or more, the Carlist player will receive +2 VP’s.

But there are other benefits to the players that come as a result of the Uprising Level on the Rest of Spain Map. For the Liberal player, at the end of each year for each region that is empty of Carlist Expeditions and has an Uprising Level of 0 or 1 (no 2’s or 3’s), they gain 1 Replacement Point in 1834-1835 and 2 Replacement Points in 1836-1837. Think of it this way. If there are no Carlist troops threatening the local Liberal supporting public, they are more willing to provide their sons to the military to fight the rebellion. But, if the Carlist fire of uprising has spread and there are active Carlist troops in the streets there will be less support for the Liberal cause.

Also for the Carlist player, if at the start of their turn there is an Expedition on the Rest of Spain Map and there are 5 or more regions with an Uprising Level of 2 or 3, they will gain +1 Action Point that can only be used to move or recruit Expeditions. Once again, if the groundswell of support is leaning toward the Carlist, the local populace are more in favor or supporting these Expeditions and expelling the Liberal from the region.

As you can see, there are a great deal of benefits for both players from the Uprising Level but there seem to be more impactful benefits for the Carlist player. If they can control the Rest of Spain Map, and dot the landscape with support and uprisings, they can win the game handily. But don’t worry, the Liberal player has an action available to them for combating and reducing the Carlist Uprising level in a region. This action is called Suppress Uprising.

Suppress Uprising is where the Liberal player can attempt to reduce the Carlist Uprising Level in a region by spending 1 Action Point and rolling 1D6. If there are no Liberal Infantry or Cavalry unit in the region, or if no
unit takes part in the action, if the result is equal to or less than the Carlist Uprising level, then the attempt has no effect. If the result if higher than the Carlist Uprising Level, then the level is reduced by -1. If there is at least 1 Liberal Infantry or Cavalry unit in the region that takes part in the action, for each Liberal Infantry or Cavalry unit after the first that participates in the action, the Liberal player adds +1 to the roll. But there are possible losses that come with using your troops in this manner.

If the result is less than the Carlist Uprising Level, then the attempt has no effect. If the result is equal to the Carlist Uprising Level, then the level is reduced by -1, and one Liberal Infantry or Cavalry unit loses 1 strength point. If the result is 6 or more, then the Uprising Level is reduced by -2. So there is incentive to make sure you use your troops in this action. A bit risky but useful and definitely worth the risk.

An Impossible War is a fantastic design that attempts to capture the historical aspects of this titanic struggle for the throne of Spain in the mid 19th century. Historically, the Carlist forces who were defenders of traditional monarchy, regional privileges, and the Catholic Church, were a minority faction fighting an overwhelmingly larger, richer liberal government. The uprising phase reflects how the Carlists compensated for this disparity by forcing the Liberal government to fight on multiple fronts and suffer from logistical nightmares across hostile terrain. The Carlist Uprising Phase, and the use of its auxiliary Rest of Spain regional map, forces some really tough dilemmas on the Liberal player. They must attempt to divide their forces between the main Game Map and the Rest of Spain Map to prevent the opposition Carlist forces from overwhelming the home territory in the north. It serves as a vital strategic balancing act for the Liberal player that cannot be ignored and must be dealt with systematically and somewhat evenly. Too much focus on the Rest of Spain Map and the situation on the Game Map will quickly snowball and they will lose control. Focus on the situation on the Game Map and the protection of Cities and Towns and the Carlist Expeditions will gain momentum and turn the countryside red. While the primary war centers on the rugged terrain of northern Spain (Navarre and the Basque Provinces), the uprising mechanic abstractly models scattered insurgencies across the rest of the country. And as you know, insurgencies can be very unpredictable and difficult to contain. You stamp out one area only to see a fire start in another. The Liberal player must divert troops and supply resources to the secondary map to quell these localized rebellions and hunt down Carlist expeditions originating from the north. And, the important thing for the Carlist player and the expansion of the uprisings and the success of their expeditions is the possible generation of generation of Prestige and Victory Points, which is really crucial to their path to victory.

In Action Point 4, we will take a look at the activation system and the use of Action Point Markers.

-Grant

An Impossible War: The First Carlist War in the North, 1834-1838 from Bellica Third Generation – Action Point 2

Von: Grant
27. Mai 2026 um 14:00

An Impossible War: The First Carlist War in the North, 1834-1838 from Bellica Third Generation is a block wargame that recreates the First Carlist War in the North of Spain which was a civil war between the Carlists who supported the succession of the late king’s brother Carlos de Borbón and the progressive and centralist supporters of the regent Maria Christina acting for Isabella II of Spain who were referred to as the Liberals. The game uses blocks representing units but also includes counters and uses cards. I was able to play the game about a month or so ago with Francisco Ronco who owns the publishing company Bellica Third Generation and very much enjoyed the game and how it represented this interesting struggle.

In Action Point 1, we took a look at the Game Map, discussing the point-to-point movement configuration, the various spaces and the delineation of the Carlist versus the Liberal Zones, as well as explained the use of the Rest of Spain smaller map. In this Action Point, we will examine the units available to both sides and cover the importance of Supply.

Units

Units in the game represent Carlist (red) and Liberal (blue) armed forces, as well as the logistics needed for these troops to operate in hostile territory. Most of the units are wooden blocks including Infantry, Cavalry, and Supply Trains but there are also cardboard counters representing Artillery, both Field and Mountain, and Knapsack units, which are limited and temporary supplies that are transported by the soldiers themselves.

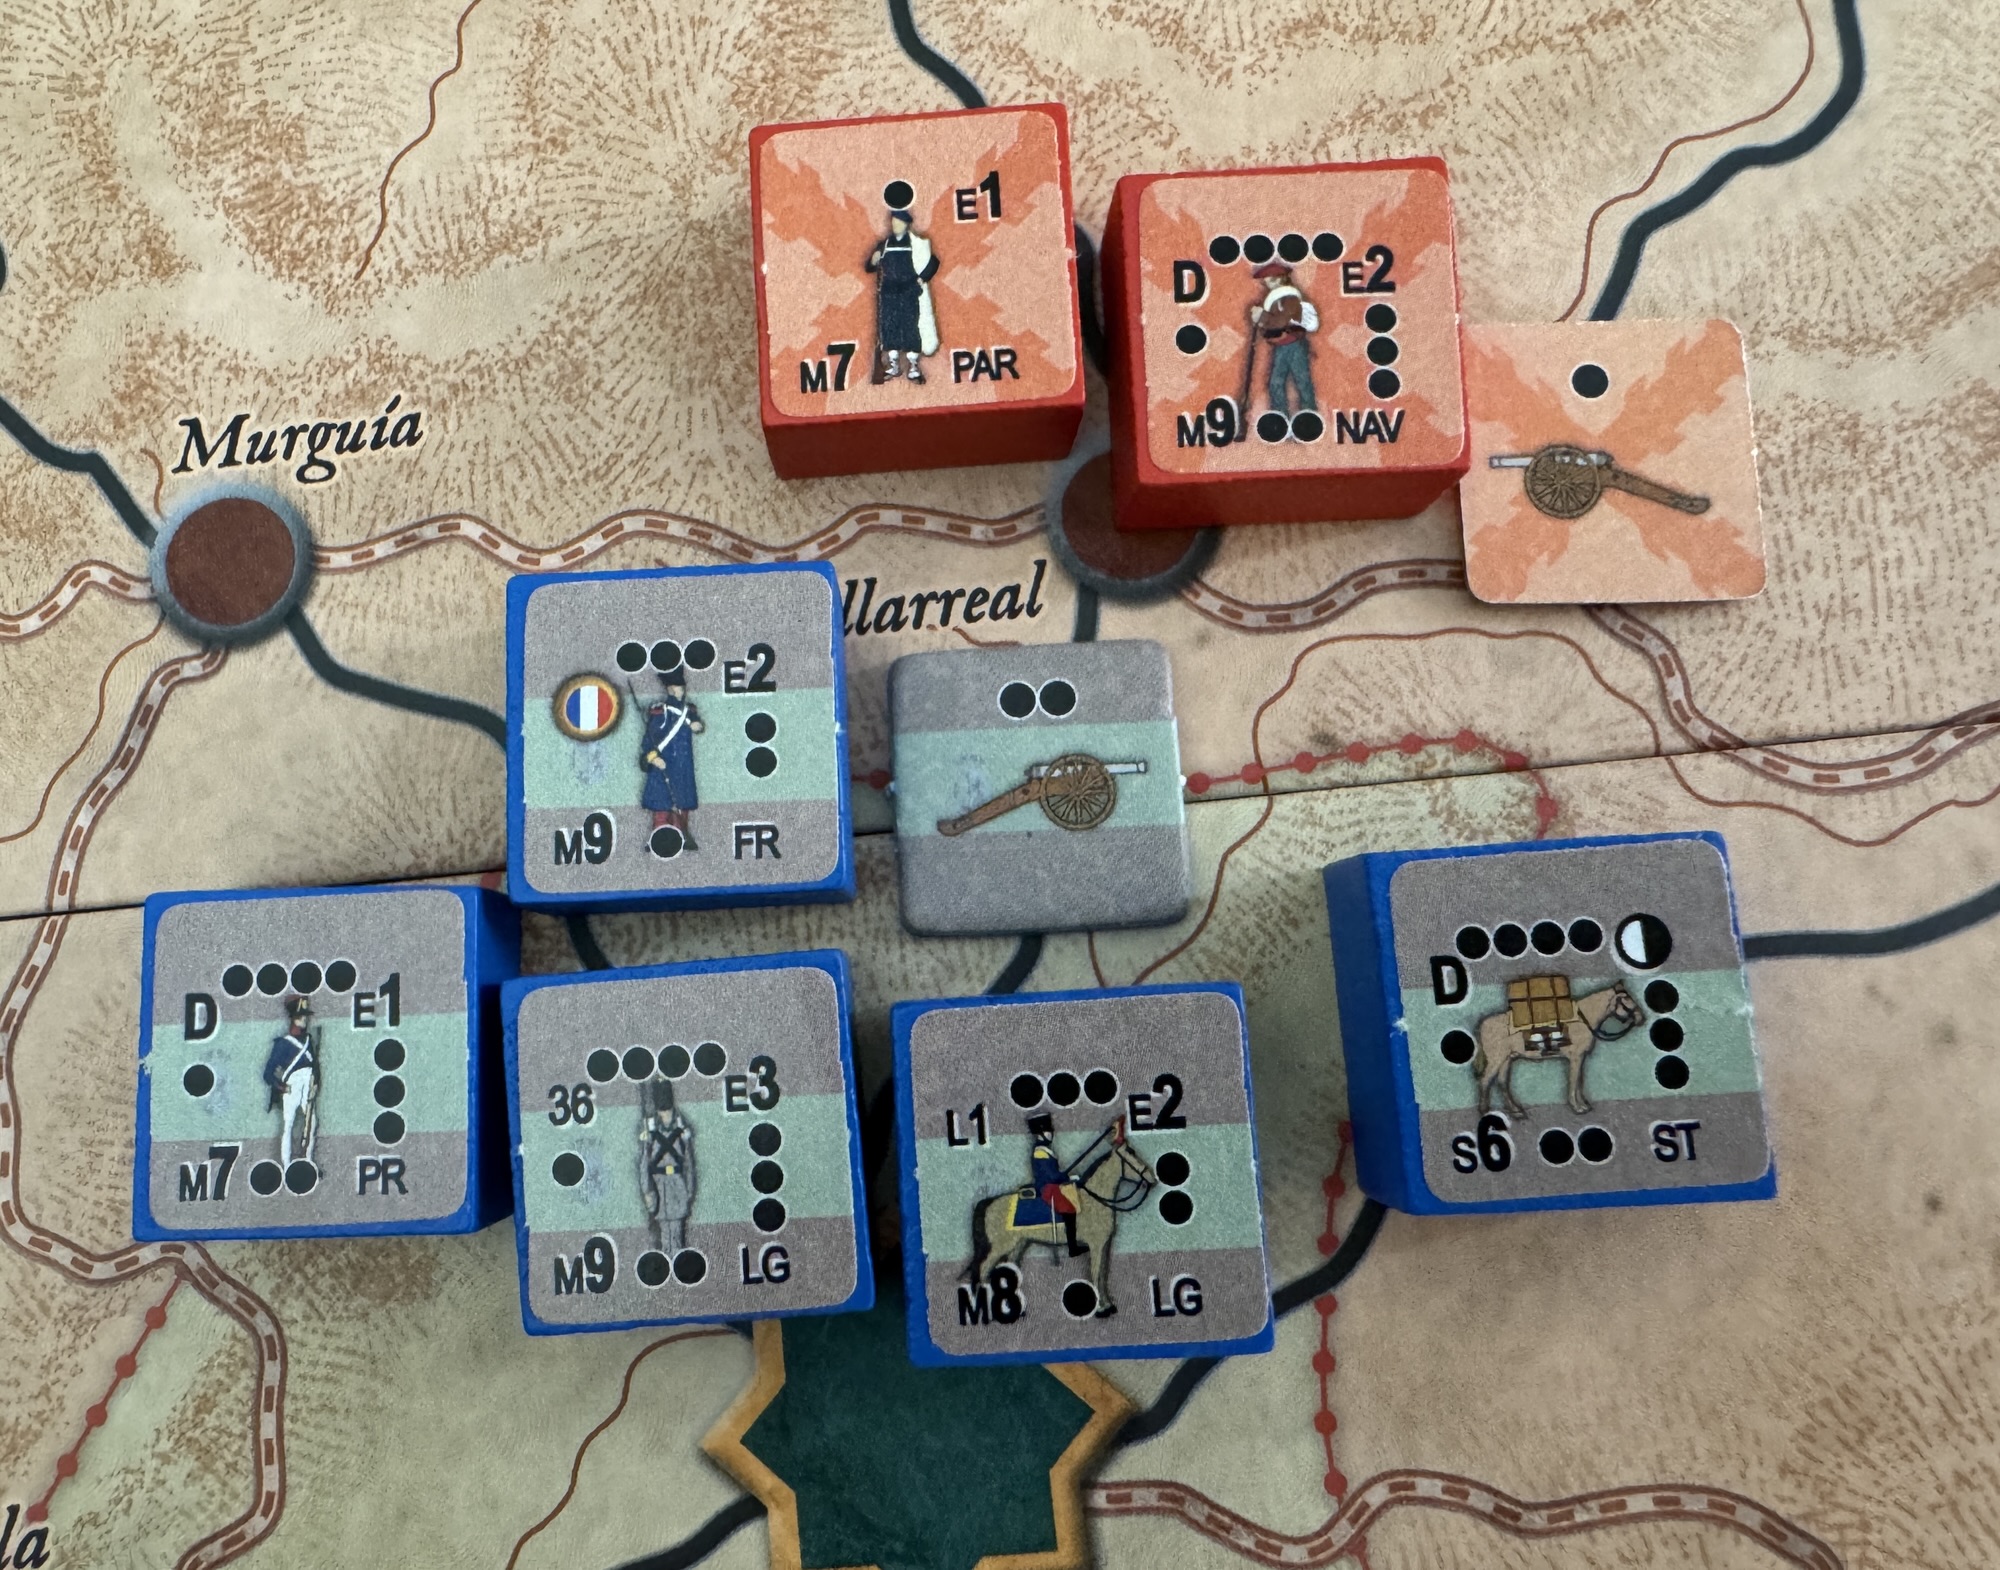
Let’s first take a look at the scale of the game and the units. With Infantry, a single Strength Point is roughly equivalent to a battalion consisting of between 500 to 800 fighting men. The only difference in the Infantry scale between the sides is a Carlist Partida unit, which represents a variable number of local guerilla fighters who are loosely organized in the amount of about a hundred men. For Cavalry, a Strength Point is equivalent to a squadron consisting of about 100 horsemen. For Artillery, a Strength Point is equivalent to 1 or 2 batteries made up of between 4 to 12 cannons of different calibers. The Supply units for the game are a very interesting and granular approach to supply and I very much enjoyed the juggle of keeping these units in good shape and with large moving armies. A Supply Train, which is represented by a block unit with the picture of a pack horse on it, represents a group of carts and pack animals that transport the needed supplies to keep an army in the field including food, munitions, and baggage. On a smaller scale are the Knapsacks that represents the food and munitions carried by the soldiers themselves.

As a Block Wargame, the Infantry and Cavalry Blocks used have various dots located along the edges of the blocks. Some blocks have 4 steps while others have less but usually no less than 3 steps. The exception to this general rule is the Partida units that only have 1 step. The current combat strength of the units determines how many 6-sided dice will be rolled in combat. During combat, for each hit that a unit receives, its strength is reduced by 1, which is shown by simply rotating the block 90 degrees counterclockwise. If a block is reduced below 1 strength then it will be eliminated.

Supply Train Blocks also have pips located on the block which represent the units ability to provide supply to other units. When the Supply unit provides supply to friendly units located in its space, its strength will be reduced by 1 pip by rotating the block 90 degrees counterclockwise. If the block is reduced below 1 strength then it is eliminated. No dice are rolled for a Supply Train in combat as it is solely a logistics unit rather than a combat unit. Supply Capacity is indicated on the units by the letter “S” and a number, such as S6 or S2. The number is the amount of friendly Infantry and Cavalry units that a Supply Train or Knapsack can supply during the Supply Check. A Supply Train with S6 can supply up to 6 friendly Infantry and Cavalry units in its space. A Knapsack with S2 can only supply a maximum of 2 units

Artillery counters show the current strength with the number of pips on the visible side of the counter. The strength determines how many dice are rolled in a Skirmish and how many points of Artillery it will contribute to
a Battle. Artillery units do not receive hits in combat, but they can be eliminated or captured if their side is defeated.

Now that you know the makeup of the units and the various forces represented, let’s take a very quick look at the statistics of each side’s combatants. Before we go any further, I am very hesitant to provide these details as I have gone over them about 10 times and am sure that I miscounted or left out certain units and their abilities. But, this look should give you an overall feel for the differences between the units and their general fighting abilities.

Carlist Units

The Carlist player will have access to a total of 26 units. These include 4 Cavalry, 21 Infantry, amongst this number are a total of 3 Partida units, and 1 Supply unit. The Effectiveness Rating for these units, which as described above equates to their fighting prowess with the higher the number the more likely they are to hit in combat, are shown in the below table with 5 units with an ER1 (20.0%), 16 units with an ER2 (64.0%) and just 4 units with an ER3 (16.0%). Keep in mind that Supply units do not have an ER as they are non-combatants.

Liberal Units

The Liberal player will have access to a total of 48 units. These include 10 Cavalry, 35 Infantry and 3 Supply units. The Effectiveness Rating for these units, which as described above equates to their fighting prowess with the higher the number the more likely they are to hit in combat, are shown in the below table with 12 units with an ER1 (26.6%), 29 units with an ER2 (64.4%) and just 4 units with an ER3 (8.9%). Keep in mind that Supply units do not have an ER as they are non-combatants.

By way of comparison, you can see that the Liberal Units have a slightly better average Effectiveness Rating (1.82 per unit) as compared to the Carlist Units (1.64). This difference is a bit deceiving though as the Carlist player actually has the same amount of ER3 units (4 for the Carlist player vs 4 for the Liberal player) but as a percentage of their total units they have 16.0% of their units as ER3 as compared to just 8.9% ER3 units for the Liberal player. This means that the Carlist units are a bit better and will generally have better units making up their forces than the Liberal player in any given battle.

The real comparison, and where the difference between the 2 sides stands out, is in the area of Morale. Morale is indicated by the letter “M” on the units and is shown as a number, such as M7, M8 or M9. This Morale number is the maximum result of the sum of 2d6 that gives a success in a morale roll. Each time during an activation that a unit receives 1 or more hits, it must then roll a Morale check. Morale checks are only made in Battle and never in a Skirmish, Assault, Pursuit, or Rout. If the Morale check fails, the failing unit will immediately be moved to the Demoralized Units Box. Morale is also key for Infantry that are being charged by Cavalry as they will make a Morale check and if they succeed they can initiate a counter charge. If they succeed the check then the attacking Cavalry will be spent and do no damage but if failed the attacking Cavalry unit fires and adds +1 to its Effectiveness Rating.

The Liberal player has an Average Morale value of their 45 units of 7.97 as compared to the Carlist player Average Morale value of their 25 units of 8.76. While not a huge difference, this slight edge to the Carlist player means that their units will be able to more often counter charge and stay on the battlefield as they will not break and become Demoralized as often.

Also, if you remove the 3 lowest value Carlist units, the 3 Partida units who each have a Morale Value of 7, this average becomes much higher at a 9.0 and really starts to show the significance of the Carlist advantage in Morale. In my play with Franciso Ronco, I felt like he definitely had the advantage on the battlefield, at least value wise in the area of Morale, but all it really took was for 1 of his better units to be demoralized and the odds became much more even.

The other advantage that the Carlist units hold is that they are typically fighting on their home turf and supply is much less stringent on their forces. The Liberal player must make consistent campaigns in the Carlist Zone of the board and this will require them to invest more into Supply units such as Supply Trains and Knapsacks.

I very much enjoyed the asymmetry between the Carlist and Liberal forces. It made for a very interesting tactical challenge for both sides as they have to play to their strengths and not get too overly concerned with the numbers. The Carlists will be much more mobile in their defense and look to exploit every gap in a supply line to move around and stay away from the numerically superior Liberal forces, whereas the Liberal player will have to move more methodically to take outlying towns and settlements to be able to shore up their lines and create less opportunities for end arounds by the Carlists. The disparity in the forces was a very interesting choice by the designer David Gómez Relloso and I am sure is reflective of the historical reality of the First Carlist War.

If you are interested, we posted an interview on the blog with the designer and you can read that at the following link: https://theplayersaid.com/2025/07/14/interview-with-david-gomez-relloso-designer-of-an-impossible-war-the-first-carlist-war-in-the-north-1834-1838-from-bellica-3rd-generation/

I also was able to shoot a fairly short video summary of my game play with Francisco Ronco who is the owner of Bellica Third Generation and you can watch that at the following link:

In Action Point 3, we will take a look at the Carlist Uprising Phase and what it means for the game.

-Grant

An Impossible War: The First Carlist War in the North, 1834-1838 from Bellica Third Generation – Action Point 1

Von: Grant
14. April 2026 um 14:00

An Impossible War: The First Carlist War in the North, 1834-1838 from Bellica Third Generation is a block wargame that recreates the First Carlist War in the North of Spain which was a civil war between the Carlists who supported the succession of the late king’s brother Carlos de Borbón and the progressive and centralist supporters of the regent Maria Christina acting for Isabella II of Spain who were referred to as the Liberals. The game uses blocks representing units but also includes counters and uses cards. I was able to play the game about a month or so ago with Francisco Ronco who owns the publishing company Bellica Third Generation and very much enjoyed the game and how it represented this interesting struggle.

In this series of Action Points, we will first take a look at the Game Map, discussing the point-to-point movement configuration, the various spaces and the delineation of the Carlist versus the Liberal Zones, as well as explain the use of the Rest of Spain smaller map, examine the units available to both sides and cover the importance of Supply, take a look at the Carlist Uprising Phase and what it means for the game, take a look at the activation system and the use of Action Point Markers, and cover some examples of Battle, focusing on the tactical aspect of combat with the use of the Battlefield Board, as well as an example of a Siege.

Main Game Map

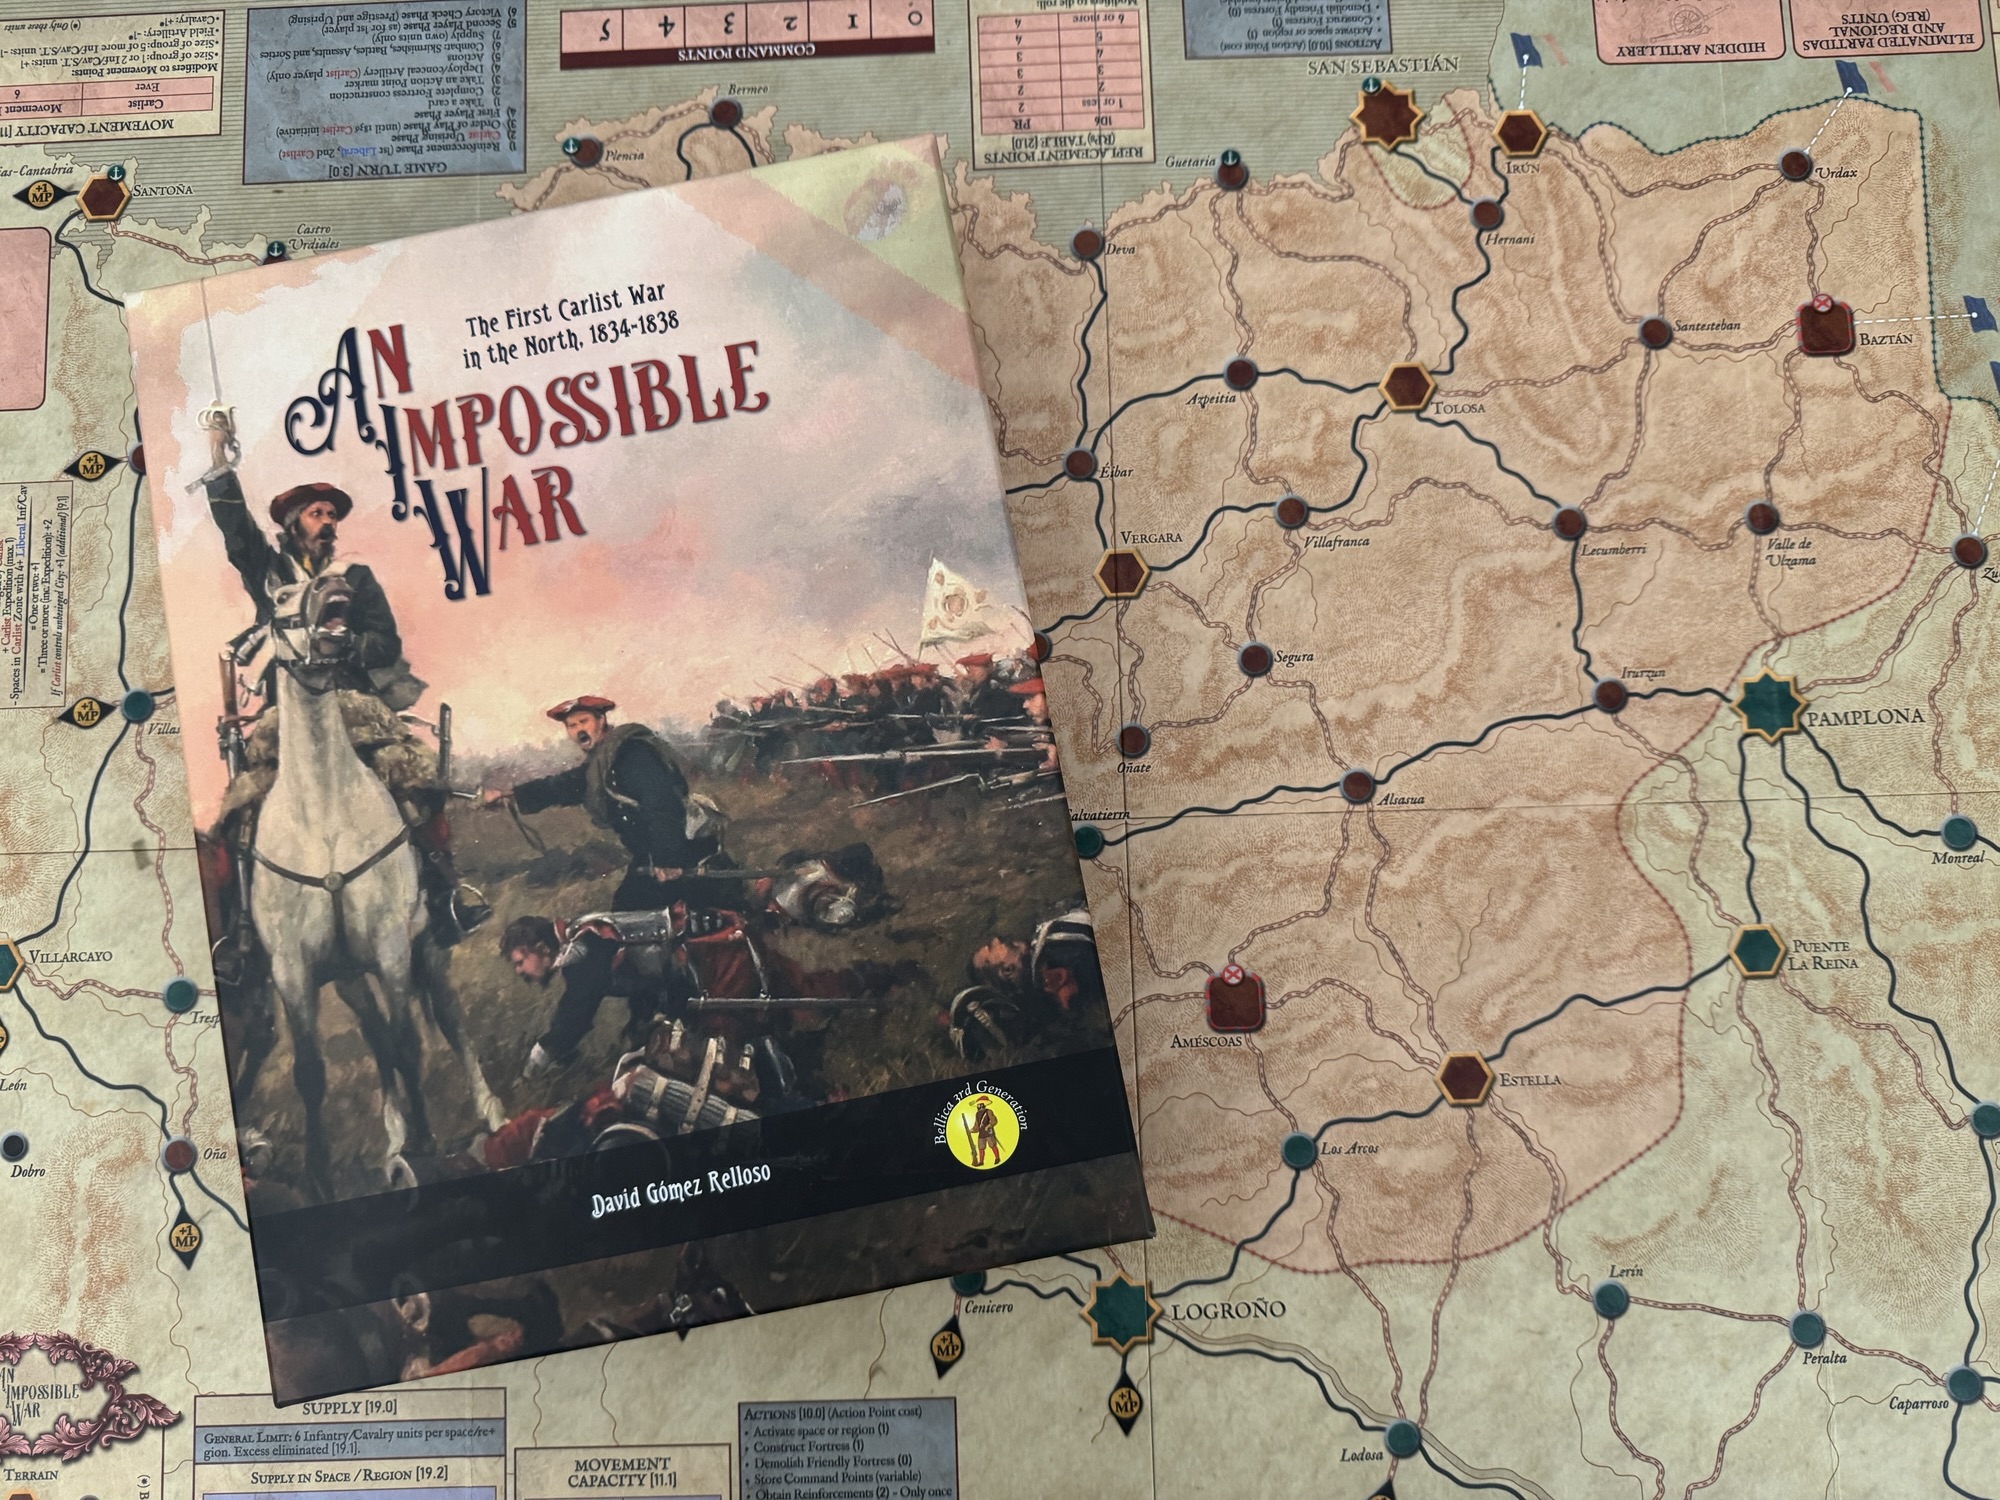
There is a Main Game Map, which is commonly referred to as the Northern Map, shows the northernmost tier of Spain along the coast of the Cantabrian Sea including Navarre, the Basque Provinces and part of Cantabria, Burgos and La Rioja, and a small secondary Game Map that reflects the regions of the rest of the country, where Carlist uprisings break out and the expeditions sent from the North may operate.

The Main Game Map contains various elements including named settlements, such as Towns and Cities, and also identify key Carlist Refuges and has a clear demarcation of Carlist and Liberal territory. There are locations identified by the name of a settlement or area, which can be of greater or lesser importance and size. There are four types of spaces including Cities, Main Towns, Carlist Refuges and Other Spaces.

Cities

Cities are represented on the Game Map by an octagonal shape and the name of the city is capitalized. If the City is Liberal it will be colored turquoise and if it leans Carlist it is colored red. There are five Cities on the Game Map including Bilbao, San Sebastián, Vitoria, Pamplona, and Logroño. All of them have a permanent Fortress as well as an Intrinsic Garrison marker indicating the controlling side. Also, the Bilbao space has a Port, identified by the anchor symbol, because it is connected to the Cantabrian Sea via the River Nervión. If the Carlist player is besieging Bilbao, or controls or is besieging either of the two spaces located next to the river (Portugalete or Guecho), the Port of Bilbao is cancelled for the purposes of naval transport and supply.

Supply is also determined based on 2 things, a Region and then each of the Cities within that Region. A Region can supply up to 6 Liberal Infantry and Cavalry units. But, a Region does not supply any Carlist units, which must obtain supply from a Supply Train or Knapsack in the Region. Without a Supply Train or a Knapsack, in order for Carlist units to get supply they then must attempt to forage. Each space can supply a certain number of units, depending on whether the space is located in the Carlist or Liberal Zone, the type of space, and the side the units belong to. We will cover this a bit more in Action Point 2 when we discuss units.

A player will gain +3 VP’s for capturing a City during the game. These are the most important ways to score in the game and protecting them is vital to either side. It is also important to keep in mind that if the Carlist player ever gains control of 2 Cities at the same time that were initially held by the Liberal player, that player will immediately gain an automatic victory.

Connecting the various Cities and Towns are the Roads. Units can move along these roads and there are 2 types of Roads including Main Roads and Secondary Roads. The Main Roads are indicated by a continuous thick black line while Secondary Roads are indicated by dashed brown lines. The cost of moving along a Main Road is 1 Movement Point and along a Secondary Road is 2 Movement Points. I found it very important to properly plan out your movements to maximize the distance that you can gain with a single action. These roads are somewhat of a spiderweb connecting points and you can reach all points eventually but finding the best and most efficient route is important. Studying the Game Map and the layout of the roads is key to playing the game well as you can block off the use of certain Main Roads and force your opponent ot move much slower on Secondary Roads frustrating their plans and efforts.

Main Towns

Main Towns are generally populated areas that have some political, economic or strategic importance and are identified on the board with a hexagonal shape that is of a similar size and proportion as the Cities. Also, the name of the town will be capitalized the same as the Cities. If the Main Town is Liberal it will be colored turquoise and if it leans Carlist it is colored red.

A player will gain +1 VP for capturing a Main Town that was held by the other side. These are not as valuable as the Cities but there are more of these on the Game Map than the Cities with 13 Main Towns as compared to only 5 Cities. Prioriting their capture and control is important for many purposes such as Supply, movement and being able to avoid interceptions and

Carlist Refuge

There are 2 Carlist Refuges identified on the Game Map including Améscoas and Baztán. These are spaces where the Carlists are particularly favored by geography and local popular support. Neither player may construct fortresses in these spaces. These Refuges are identified with a square with an X at the top and a dashed brown line.

Carlist Zones and Liberal Zones

The Carlist Zones take up a considerable portion of the Game Map which is denoted with a red shaded background and a dotted red line. All locations within it are considered to be in the Carlist Zone, while all locations outside of it are considered to be in the Liberal Zone. Also, spaces adjacent to the Carlist Zone are spaces belonging to the Liberal Zone, but that are connected via a road to any space within the Carlist Zone.

The Carlist units in the game are tied to specific localities—Navarre, the Basque Provinces, or “Castilians”—rather than a standard, monolithic national army and are numerically outnumbered by the Liberals. As such, they have a clear need to be nimble and move around the board causing difficulties. One of the ways the Carlist player scores Victory Points through the increase in Prestige is by is controlling at least 4 spaces with at least 4 units. If there are at least four Liberal infantry or Cavalry units in the same space in the Carlist Zone 1 is subtracted
from the sum of besieged Cities and active Expedition.

Essentially, the zone embodies the “Impossible War” by forcing the Carlist player to maximize localized, high-quality forces in their home territory against a numerically superior foe. The Carlist player increases their Prestige by besieging cities and launching expeditions. They also benefit from the growing Carlist uprising in the rest of Spain. The Liberal player will be busy countering Carlist Prestige, putting down uprisings, and hunting down expeditions. They have the advantage that, in the long run, war fatigue will affect the enemy.

The terrain is simple with each space containing rough or open terrain, depending on the relief of its area. Much of the northern geography was rugged, which played an important role in favor of Carlism, as it mitigated three of the advantages of government troops: their superiority in numbers, cavalry, and artillery.

The spaces at the western, southern, and eastern ends of the map have connections to regions on the map of the rest of Spain, which can be used to move from one map to another.

Finally, the Game Map includes various game tables (Year, Turn, Initiative, Victory Points, Carlist Prestige, etc.), as well as a lot of information about commonly used rules, so players don’t need to consult the rulebook that often.

Rest of Spain Smaller Map

The map of the Regions of Spain is smaller and simpler. It consists of nine large regions that cover large territories. This map’s purpose is to record the spread of the Carlist uprisings, to enable Carlist expeditions to operate and for the Liberal player to hunt them down. We will take a closer look at the Carlist Uprising Phase in a later post but I wanted to show you the map so you understand its layout.

I very much enjoyed An Impossible War, even though I played just a few turns of a smaller scenario with Francisco Ronco. He was a master at the game, as obviously as the publisher and a playtester he is intimately familiar with the rules and strategies, and I learned a lot from him about how the game should be played. I am looking forward to future plays as the game is just very good and has some interesting aspects that create a very tense and interesting game of maneuver and strategy. The Game Map is very well done, from an aesthetic perspective as well as functionally, and the board makes playing the game easier.

In Action Point 2, we will examine the units available to both sides and cover the importance of Supply.

-Grant

❌