With this My Favorite Wargame Cards Series, I hope to take a look at a specific card from the various wargames that I have played and share how it is used in the game. I am not a strategist and frankly I am not that good at games but I do understand how things should work and be used in games. With that being said, here is the next entry in this series.
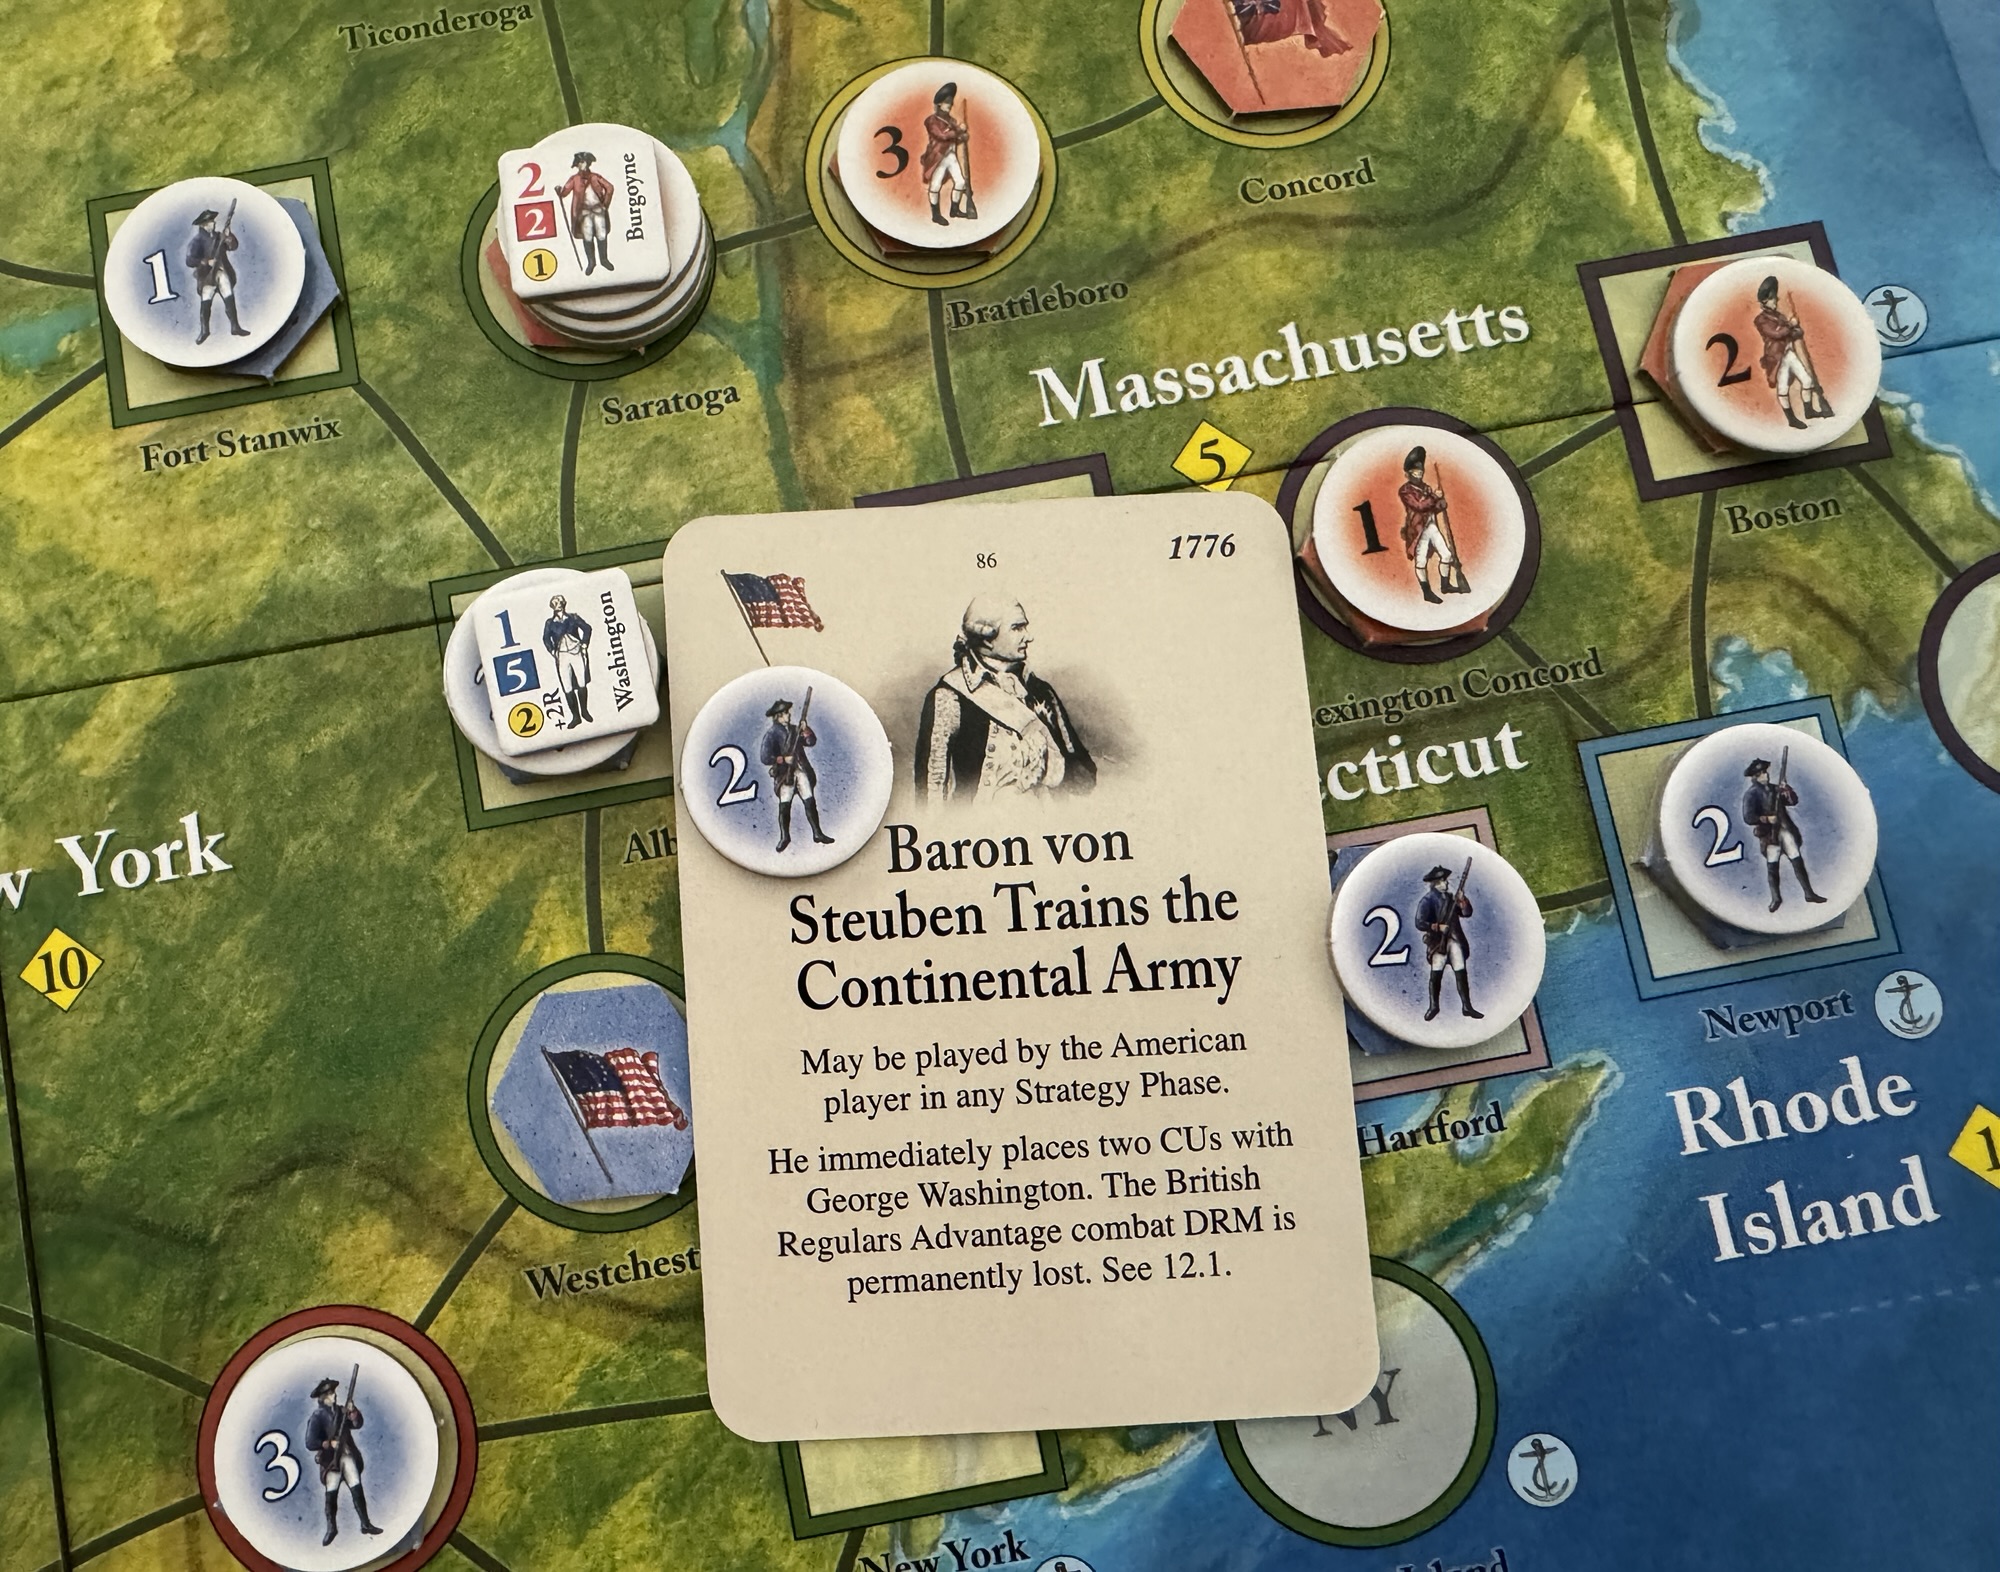
#81: Baron von Steuben Trains the Continental Army from Washington’s War from GMT Games
Washington’s War is a war game, make no mistake about that. But, it is virtually impossible to win the game by focusing only on the field of battle. For that to happen, the Patriots need to completely drive the British forces out of the 13 colonies or the British need to wipe the American forces off the map. Both are extremely difficult and I would be surprised if any more than 1 out of 30 games ended in such a way. Rather, the ultimate goal of the game is to have political control of the colonies. If at the end of the game the Patriots control 7 colonies, while holding the British to control of less than 5, they win. If not, the British win. Simple as that. So, you can see that battle is not the main goal but control is. And more importantly political control.
I really like this about the design and feel that the real core of the American Revolution was the groundswell of patriotism and the desire to live free from the shackles of an overseas monarch who cared little for the American way of life. This desire led great men of the time to sacrifice themselves, their livelihood and their families to further the true cause of liberty and build a truly free and democratic nation where individual liberty and freedom was prioritized over anything else. And yes, I realize that this nation was not perfect, not without contradiction but the concept of liberty helped to form a country that would lead to the ultimate freedom of all people.
Washington’s War is a Card Driven Game, and as such, relies on cards to provide to players the actions needed to play the game. The cards contain OPS Points which can be used to drive various actions, including such things as activating leaders, who in turn will then move with forces to attack, and also contain written text in the form of events. These events can be played only by the side they are intended for and if drawn and played by the opposing side, they can only be thrown away while granting a few possible actions, such as placing or removing Political Control markers.
In today’s entry, I have chosen this card to showcase one of my favorite events from the history of the American Revolution. The card for today is called Baron von Steuben Trains the Continental Army and has a dual focus. It will add Combat Units or CU’s to go along with General Washington but most importantly changes the balance of the game for battles. The card text reads “May be played by the American player in any Strategy Phase. He immediately places two CU’s with George Washington. The British Regulars’ Advantage combat DRM is permanently lost”. Now don’t get me wrong, gaining a free injection of 2 CU’s worth of fighting forces is a nice bonus for the Patriots but the real benefit of the card is that it changes the game. At the start of the game, the British receive a +1 Dice Roll Modifier (DRM) in all battles until what is called the British Regulars’ Advantage is lost. The British Regulars’ Advantage will be lost immediately if the British lose 3 or more CU’s in a single battle and of course, the British may also lose the British Regulars’ Advantage as a result of the play of this card. I very much like this card and it is very important for the hopes of the rebellion. I have found that the +1 DRM is really difficult to overcome for the Patriots and I found that my hopes in combat at the beginning of the game are almost always a 50/50 proposition. But once this card is played, that changes and I feel like the Patriots can better go on the offensive and openly hunt down and attack the British with confidence.
I have always been impressed with the Patriot effort to bring in professional soldiers from Europe to assist them in training and leading the Continental forces. Names like Marquis de Lafayette (France), Baron von Steuben (Prussia), Casimir Pulaski (Poland), Tadeusz Kościuszko (Poland) and Baron de Kalb (Bavaria) to name just a few. These European Generals had experience and knowledge, which were commodities that the Patriots didn’t have a lot of.
Friedrich Wilhelm August Heinrich Ferdinand Fresher von Steuben was a Prussian-born army officer who played a leading role in the American Revolutionary War by reforming the Continental Army into a disciplined and professional fighting force. His contributions marked a significant improvement in the performance of Patriot troops and he is consequently regarded as one of the fathers of the United States Army.
Born into a military family, Steuben was exposed to war from an early age; at 14 years old, he observed his father directing Prussian engineers in the 1742 siege of Prague. At age 16 or 17, he enlisted in the Prussian Army, which was considered the most professional and disciplined in Europe. During his 17 years of military service, Steuben took part in several battles in the Seven Years’ War, rose to the rank of captain, and became aide-de-camp to King Frederick II of Prussia, who was renowned for his military prowess and strategy. Steuben’s career culminated in his attendance at Frederick’s elite school for young military officers, after which he was abruptly discharged from the army in 1763, allegedly by the machinations of a rival.
In 1775, as the American Revolution had begun, Steuben saw a reduction in his salary and sought some form of military work; unable to find employment in peacetime Europe, he joined the Patriot war effort through mutual French contacts with American diplomats, most notably ambassadors to France being Silas Deane and Benjamin Franklin. Due to his military exploits in Europe, and his willingness to serve the Americans without compensation, Steuben made a positive impression on both Congress and General George Washington, who appointed him as temporary Inspector General of the Continental Army.
Appalled by the state of Continental forces, Steuben took the lead in teaching soldiers the essentials of military drills, tactics, and discipline based on Prussian techniques. He wrote Regulations for the Order and Discipline of the Troops of the United States, which remained the army’s drill manual for decades, and continues to influence modern U.S. army manuals. Steuben also addressed widespread administrative waste and graft, helping save desperately needed supplies and funds. As these reforms began bearing fruit on the battlefield, in 1778, on Washington’s recommendation, Congress commissioned Steuben to the position of Inspector General with the rank of major general. He served the remainder of the war as Washington’s chief of staff and one of his most trusted advisors.
Baron von Steuben drilling American recruits at Valley Forge in 1778 by Edwin Austin Abbey.
According to Peter Stephen Du Ponceau, Steuben’s personal secretary and interpreter, “The Baron loved to speak of…his sansculottes (radical partisans, urban laborers, and common people of the lower classes during the French Revolution), as he called us. Thus the denomination was first invented in America…when, it could not be foreseen, that the name which honoured the followers of Washington would afterwards be assumed by the satellites of a Marat and a Robespierre”.
After the war, Steuben was made a U.S. citizen and granted a large estate in New York in reward for his service. In 1780, he was elected a member of the American Philosophical Society, a learned society that included many of the nation’s most prominent Founding Fathers.
Here is a link to our full video review of the game:
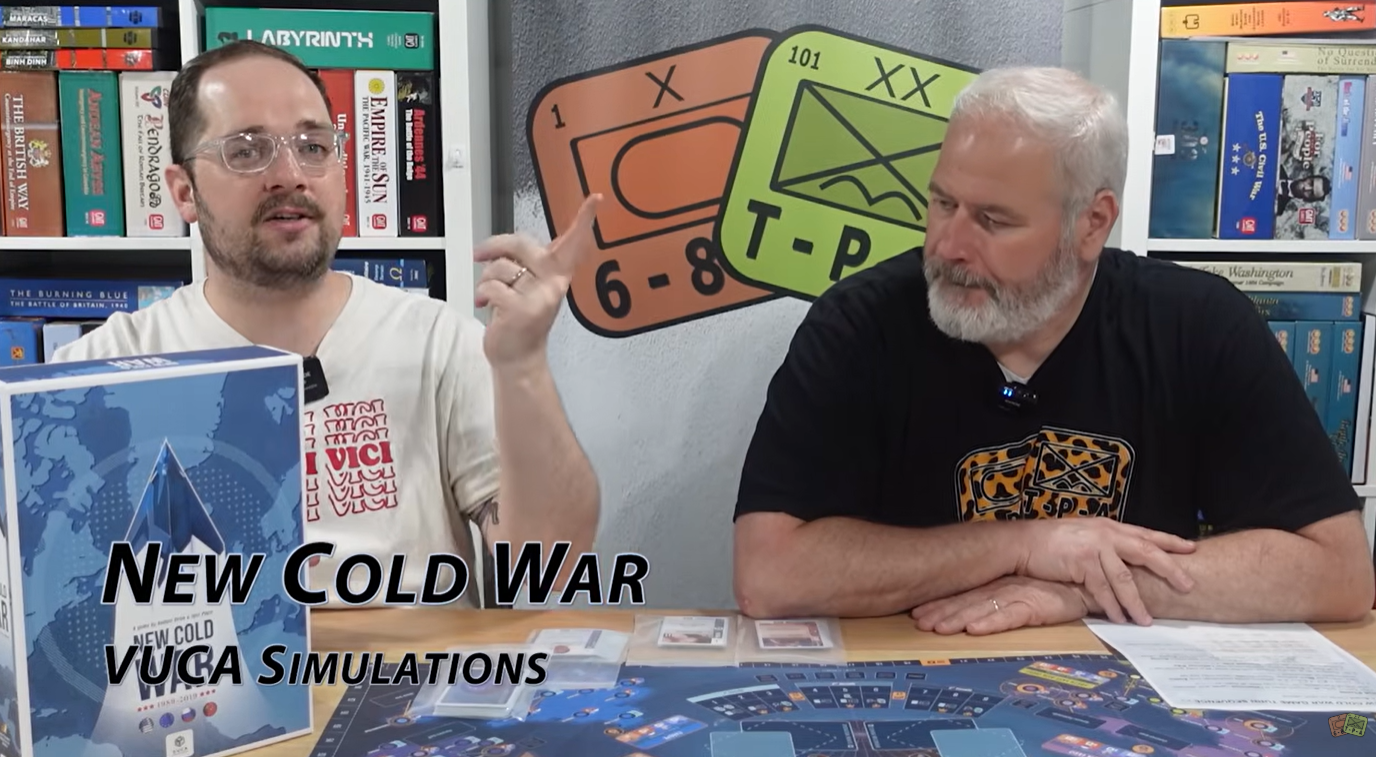
New Cold War: 1989-2019 is a Card-Driven Game based in the most important geopolitical events from 1989 to 2019. Players lead one of the four great powers (Russia, China, US, EU) in their fight for the new world order. Initially, the confrontation is between the red bloc, consisting of Russia and China and the blue bloc, comprising the United States and the European Union. However, each player must also prioritize their own strategy, as only one power can emerge victorious at the end of the game. Therefore, this game starts with cooperation between allied powers in the early stages but becomes entirely competitive as the moment of final victory approaches.
New Cold War utilizes a Card-Driven game mechanic. Players strive to attain victory by gaining international prestige, dominating the media and increasing their control of countries and different regions of the world. Other key factors to manage include military force and United Nations Security Council vetoes. Players’ strategies are determined by a series of hidden objectives they must pursue to achieve victory.
The game accommodates three or two-player versions and includes a solitaire mode through a system of bots.
La Der des Ders – The War to End War from Hexasim is a 1-2 player slightly abstracted strategic level look at World War I. The game allows the players to relive the First World War at a strategic level, with each player controlling one of the 2 sides either the Entente, consisting of France, England, Russia, Serbia and other minor nations or the Central Powers including Germany, Austria-Hungary, the Ottoman Empire and a few minors. La Der des Ders can also be played solo, with a dedicated solitaire bot called “Athena” who utilizes special Cornflower Cards to make decisions about what technologies to invest in, where to undertake offensives and how to utilize limited resources and reinforcements. Each turn, players gain an amount of Resource Points dependent on what nations are in the war, which they can allocate to different areas to guide their overall strategy. Victory is achieved by launching offensives that drain the morale of enemy nations, forcing them out of the conflict through collapse.
In Action Point 1, we looked at the Game Board, discussing the Collapse Tracks, Trade Tracks, Russian Revolution Track and Naval Control Table and other various on-board tables and offensive spaces. In Action Point 2, we covered the Technology Phase and the Technology Tree and Technological Improvement Boards. In Action Point 3, we examined the Event Cards and how they inject the historical narrative into the gameplay and also alter the conditions of the game. In Action Point 4, we walked through an example of an Offensive and took a look at the combat procedure. In Action Point 5, we reviewed the Victory Conditions. In this Action Point, which is the final entry in the series, we will give an overview of the “Athena” solitaire bot and how it works.
Athena
La Der des Ders – The War to End War is designed as a 2-player game but it does have a dedicated solitaire bot called Athena that can be used to simulate an opponent to play against. This Athena bot, named after the Greek goddess of strategy, can be used to play as either the Entente or as the Central Powers and is focused on the use of special cards referred to as Cornflower Cards. There are 12 of these Cornflower Cards and these are used to determine the various actions taken by the Athena bot during their turn. A solitaire play uses the usual rules for the 2-player game, with just a few exceptions.
The Cornflower Cards are multi-use cards that are divided into 3 different sections to be used at different points of the Sequence of Play in a solitaire game. They are drawn and referred to during the Technology Development Phase, the Reinforcement Phase and the Offensive Phase. Let’s take a look at the anatomy of these cards. In the above picture, you will notice that there are 3 main categories listed at the top of the card including Technologies at the top, Reinforcements in the middle and Offensives on the bottom of the card. During the appropriate phase, the player will draw 1 Cornflower Card for the Athena AI.
If it is the Technology Development Phase, the player will refer to the top of the card where there are listed the 6 different technologies that can be pursued. Under each of these categories will show the number of Resource Points that will be spent by Athena in order to attempt to unlock a new level in each of the technologies. If there is an X in that space, that means that Athena will not attempt to gain a level of that technology during this phase. If there is a 2 listed, this means that 2 RP will be spent and the roll for the technology will gain a +1 DRM. Keep in mind though, that if the technology shown is not available yet because the year it is available has not yet arrived, then the bot will not spend a resource to attempt that technology. If Athena doesn’t have enough Resource Points to make all the attempts shown on the card, she will spend as much as possible to attempt these technologies. Athena never re-rolls the die for these attempts by discarding a Technological Research Cube for previous failed attempts. One of the differences for Athena during this step is that if a success is earned in unlocking a level of technology, she will get to advance all cylinders of the corresponding technology in all sectors under Athena’s control. This means all of the countries of the alliance as well as the active minors. These technological improvements cost no Resource Points.
If it is the Reinforcement Phase, Athena will attempt to reinforce sectors that have suffered losses in previous turns according to the following priority order:
The sector which suffered the most losses or in other words the sector whose cube is furthest from its maximum;
The sector with the second most losses and then the sectors in the following order, ignoring the sectors already covered above:
When you have chosen what sector is to receive reinforcements based upon the priority described, the player will draw as many Cornflower Cards as there are spaces separating the Sector Cube from the space with the red value. After drawing the cards, the player will count the instances of cards that have the name of that sector shown on them. If you look at the 3 cards shown above, if doing reinforcements for Germany they would move their Sector Cube up only 1 space on the Collapse Track as once Germany is listed in the middle of the card under Reinforcements. Very simple. Athena will also have to spend the required Resource Points from their total to actually move the Sector Cube up and if they cannot afford all of the reinforcements shown by the cards, they will move and pay for what they can afford. This phase ends when Athena no longer has enough Resource Points, or when all the sectors have been able to try to obtain reinforcements.
Finally, if it is the Offensive Phase, each side launches an offensive in turn starting with the side that has the initiative. When it is Athena’s turn to attack, the player will draw one Cornflower Card and refer to the bottom portion of the card, which will indicate the sector Athena is attacking. The sector to be attacked will be the one on the left of the card if Athena is playing the Entente, and the one on the right if she is playing as the Central Powers. The sector indicated on the card must always be attacked by the sector that has the best chance of inflicting damage. This usually means the sector with the highest current Operational Value and that has not yet launched an Offensive this turn. In the event of a tie, preference should be given to the sector least likely to be able to attack elsewhere during a later card draw in the turn. The size of the Offensive will be equal to the current Operational Value of the attacking sector only if the number of Resource Points Athena has remaining will allow for it. Otherwise the Offensive is reduced to the number of remaining RP. Once Athena’s Resource Points have been spent, the dice rolled and any losses applied, the player will then take their own turn to launch an Offensive or decide to pass. Then Athena will draw a new Cornflower Card to determine their next Offensive. If there are ever 3 Cornflower Cards drawn by Athena without having the ability to attack because of sector availability or Offensives by adjacent sectors have already been taken, the Offensive Phase will come to an end.
That is all there is to the Cornflower Cards and the Athena bot. It is a really well designed system that removes most of the work by the player when playing solitaire. There will be times when you have to make a decision, as described above with Offensives, but these decisions are easy and the hard work is done by the simple flipping of a card.
I do want to point out one final thing. The sequence of play differs slightly from the 2-player game as it rearranges when the Athena bot does a few of the steps during the Spend Resource Points Phase as shown below. The human player will start by doing their Reinforcements first followed by their Technology investment. Athena will then go and do their Technology investment first followed by Reinforcements. Both players will then move into the Offensive Phase and the player with initiative as shown on the turn track will take the first Offensive of the turn.
The Athena bot works very well as a playable solitaire experience for La Der Des Ders. The Cornflower Cards are a stroke of genius and really are easy to use, which makes playing the game a much better experience. I found that the bot actually holds its own in the game, even though they are not in total control of their own actions like a human player would be. The changes also made in the Sequence of Play as well as to the way Technology Investments work more than make up for the lack of true intelligence by the system and will definitely give the player a run for their money. I have played the game about 5 times solitaire, both as the Entente and as the Central Powers, and have won just 2 out of 5 tries. But the experience was easy, enjoyable and pretty seamless. The game really is a great example of a slightly abstracted strategic level look at World War I and I would wholeheartedly recommend this game to anyone who has an interest in The Great War.
I shot a playthrough video for the solitaire system and you can watch that at the following link (beware as I did make a few errors but I have found errors make viewers understand the rules of the game better):
I also did a video review and you can watch that at the following link:
Thank you for allowing me to share this game with you through this series of posts over the past several months. I have very much enjoyed doing these and I hope that you find them helpful.
La Der des Ders – The War to End War from Hexasim is a 1-2 player slightly abstracted strategic level look at World War I. The game allows the players to relive the First World War at a strategic level, with each player controlling one of the 2 sides either the Entente, consisting of France, England, Russia, Serbia and other minor nations or the Central Powers including Germany, Austria-Hungary, the Ottoman Empire and a few minors. La Der des Ders can also be played solo, with a dedicated solitaire bot called “Athena” who utilizes special Cornflower Cards to make decisions about what technologies to invest in, where to undertake offensives and how to utilize limited resources and reinforcements. Each turn, players gain an amount of Resource Points dependent on what nations are in the war, which they can allocate to different areas to guide their overall strategy. Victory is achieved by launching offensives that drain the morale of enemy nations, forcing them out of the conflict through collapse.
In Action Point 1, we looked at the Game Board, discussing the Collapse Tracks, Trade Tracks, Russian Revolution Track and Naval Control Table and other various on-board tables and offensive spaces. In Action Point 2, we covered the Technology Phase and the Technology Tree and Technological Improvement Boards. In Action Point 3, we examined the Event Cards and how they inject the historical narrative into the gameplay and also alter the conditions of the game. In Action Point 4, we walked through an example of an Offensive and took a look at the combat procedure. In this Action Point, we will simply review the Victory Conditions.
Victory Conditions
In La Der des Ders, there are a few ways to trigger the concept of Sudden Death, which leads to the game concluding and a victor being declared, or to win the game through armistice being signed and then through the accumulation of Prestige Points. Let’s first take a look at what I think is the most common way for the game to come to an end, Sudden Death.
Sudden Death
The game will end immediately in the event of Sudden Death and this Sudden Death can be triggered in three ways. First, if France surrenders, the Central Powers will immediately win the game, second if Germany surrenders, the Entente will immediately win the game and finally if any one side achieves 6 Victory Points then that side immediately wins the game. Really pretty simple. If countries other than France or Germany surrender, such as Austria-Hungary, Russia or the Ottoman Empire, the game will continue although the Production Value of the surrendered country will no longer be included in the sides Resource Points.
Now there is a remote possibility that both sides could trigger Sudden Death at the same time through an attack. Remember, that if the attacker rolls a 1 on their Attack Dice, it will result a Counter Attack and 1 loss on their Collapse Track and if this would cause them to have to surrender as well as inflicting enough hits on their target to reach the end of their Collapse Track, both will Surrender and then neither side will win. But also, this could possibly occur with the play of the Spanish Flu Event, which causes losses to all powers. This is a rare possibility but it can happen.
One of the things that I very much like about this game is the concept of Collapse and the fatigue and weariness of war. World War I drug on for 4 long years and particularly on the Western Front very little ground was actually gained. During the early years of the war in 1915–1916, these advances were measured in mere feet, while later in the war during the campaigns of 1918, particularly in the case of the Hundred Days Offensive, which began on August 8, 1918, the Allies achieved deep, lasting breakthroughs, pushing the Germans back to their original 1914 lines. But the war was a meat grinder, plain and simple, and attacks were made sometimes to keep the war going because High Command demanded action and not necessarily to gain any ground or obtain any key objectives. Resources dwindled, troops dried up as men were shattered, maimed and demoralized to the point of being unable to stand a watch or fight, and nation’s desire for the war to continue faded. I think that at points, one breakthrough or catastrophic loss could have ended the war and this is very well reflected in La Der des Ders as if you are too low on your own Collapse Track and decide to attack because you believe you can finish your opponent you always have a chance of catastrophe and losses of your own while on the offensive.
Armistice
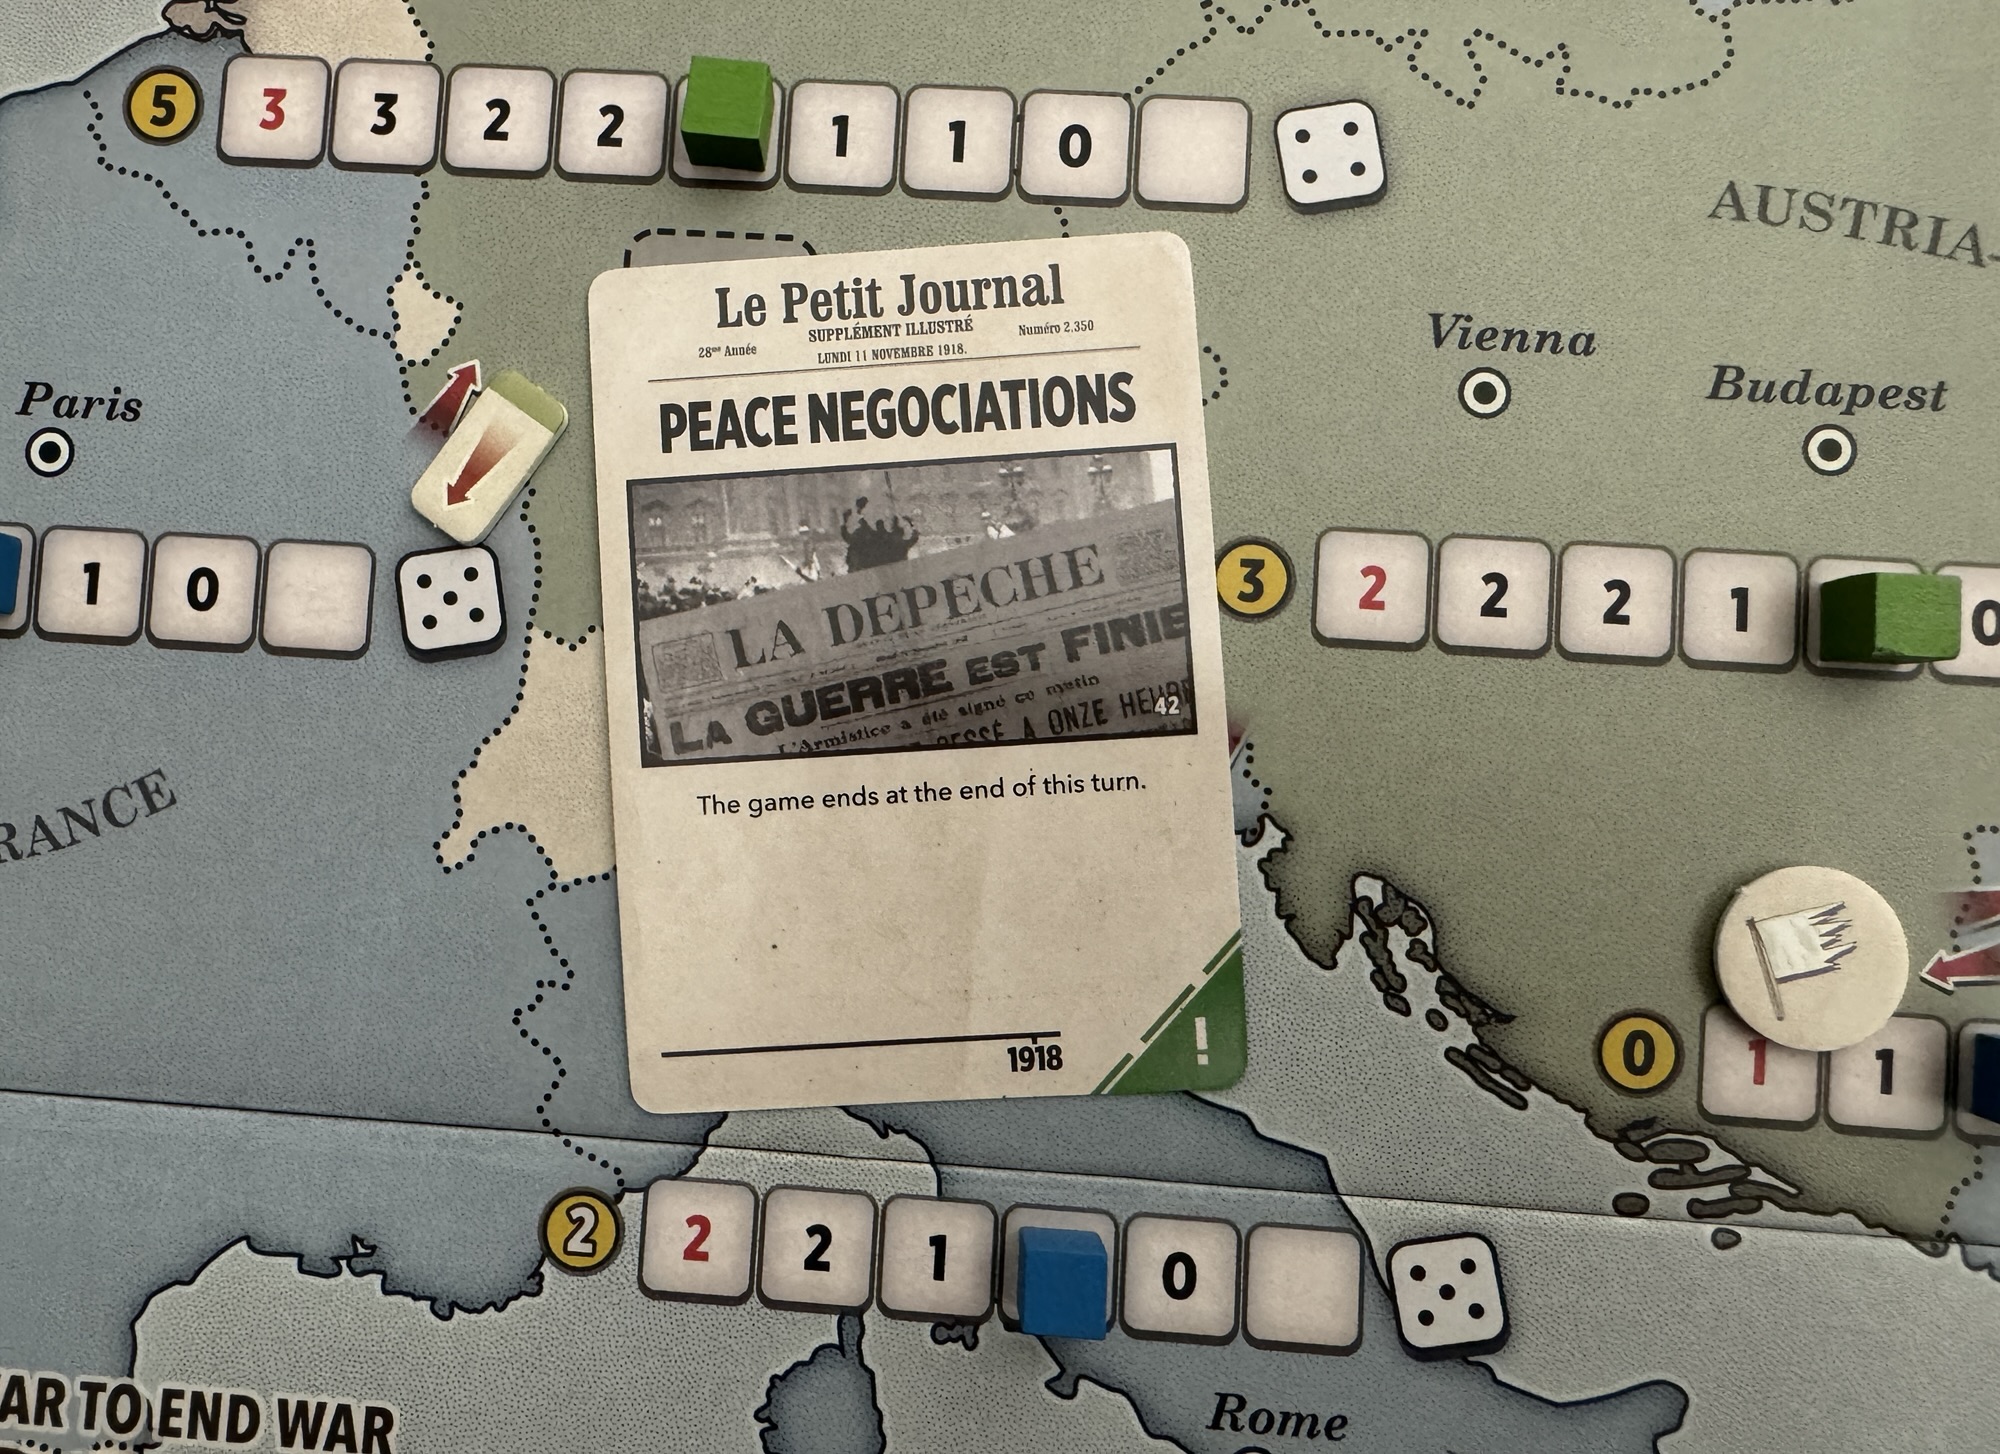
Aside from the Sudden Death ending, the game can end in 2 ways including at the end of the turn during which the Peace Negotiations card was drawn, or at the end of turn 14. In both of these cases, the side with the most Prestige Points is declared the winner. If there is a tie, the Central Powers will win the game.
So what are Prestige Points? Prestige Points are a concept that takes into account the standing of each of the combatant nations on both sides, using the location of the Sector cube on their Collapse Track as a base, and then uses a simple mathematical formula to determine the overall standing and condition of the nations morale, production and will to fight. One of the most important parts of this calculation though is that it only takes into account nations that have not collapsed and surrendered. If a nation has been forced to surrender because their Collapse Track reached the end, they will not count toward the Prestige Points of their allied side.
Each player will calculate their total Prestige Points very simply by paying attention to several numbers such as the Operational Value and Prestige Value. For each country still At War during the Armistice, the player multiplies the sector’s current Operational Value (OV), which is shown by the location of the Sector cube on the Collapse Track, by its Prestige Value (PV), which is the value printed on the left side of the Collapse Track. The various nations’ Prestige Values are Germany 5, France 4, Austria-Hungary 3, Ottoman Empire 3, Italy 3, Middle East 3 and all other Sectors 1.
Let’s take a look at a quick example of how to calculate Germany’s Prestige Points. If Germany is still At War and their Collapse Track is showing an Operational Value of 2, then we will multiply their Prestige Value shown on the far left of the Collapse Track of 5 x the Operational Value of 2 resulting in a total of 10 Prestige Points. The players then add the number of Victory Points (VP) indicated by the location of their marker on the Victory Point Track. You might be wondering Where do Victory Points come from? Victory Points are specifically earned from forcing countries to surrender and the side that caused the surrender will earn a number of Victory Points as shown in the rules. For the Entente, their values are Russia 3 VP, Italy, Middle East and Romania 2 VP and Serbia, Africa and Greece 1 VP. For the Central Powers, their values are Austria-Hungary 3 VP, the Ottoman Empire and Bulgaria 2 VP and the German Colonies 1 VP.
I very much like the concept of only calculating the value for those countries who have not Collapsed and who are still in the war. We all know that it is easier to negotiate a peace that is favorable to your side when you are still a threat and if too many nations of either side have collapsed then their Prestige Points will reflect this as those countries won’t contribute to the final value. And I also like the simplicity of the scoring system. If certain key countries like France and Germany surrender, then that equates to a victory for the side causing the surrender and if the game continues to grind on through the final turn, then there is this calculation that is really pretty simple and gives importance to each goal with a different value that can be earned. Just a solid method for determining victory that makes sense and fits with the historical aspect of the outcome of the Great War.
In Action Point 6, which is the conclusion to this series, we will give an overview of the “Athena” solitaire bot and show how it works for solitaire play.
La Der des Ders – The War to End War from Hexasim is a 1-2 player slightly abstracted strategic level look at World War I. The game allows the players to relive the First World War at a strategic level, with each player controlling one of the 2 sides either the Entente, consisting of France, England, Russia, Serbia and other minor nations or the Central Powers including Germany, Austria-Hungary, the Ottoman Empire and a few minors. La Der des Ders can also be played solo, with a dedicated solitaire bot called “Athena” who utilizes special Cornflower Cards to make decisions about what technologies to invest in, where to undertake offensives and how to utilize limited resources and reinforcements. Each turn, players gain an amount of Resource Points dependent on what nations are in the war, which they can allocate to different areas to guide their overall strategy. Victory is achieved by launching offensives that drain the morale of enemy nations, forcing them out of the conflict through collapse.
In Action Point 1, we looked at the Game Board, discussing the Collapse Tracks, Trade Tracks, Russian Revolution Track and Naval Control Table and other various on-board tables and offensive spaces. In Action Point 2, we covered the Technology Phase and the Technology Tree and Technological Improvement Boards. In Action Point 3, we examined the Event Cards and how they inject the historical narrative into the gameplay and also alter the conditions of the game. In this Action Point, we will walk through an example of an Offensive and take a look at the combat procedure.
Offensives
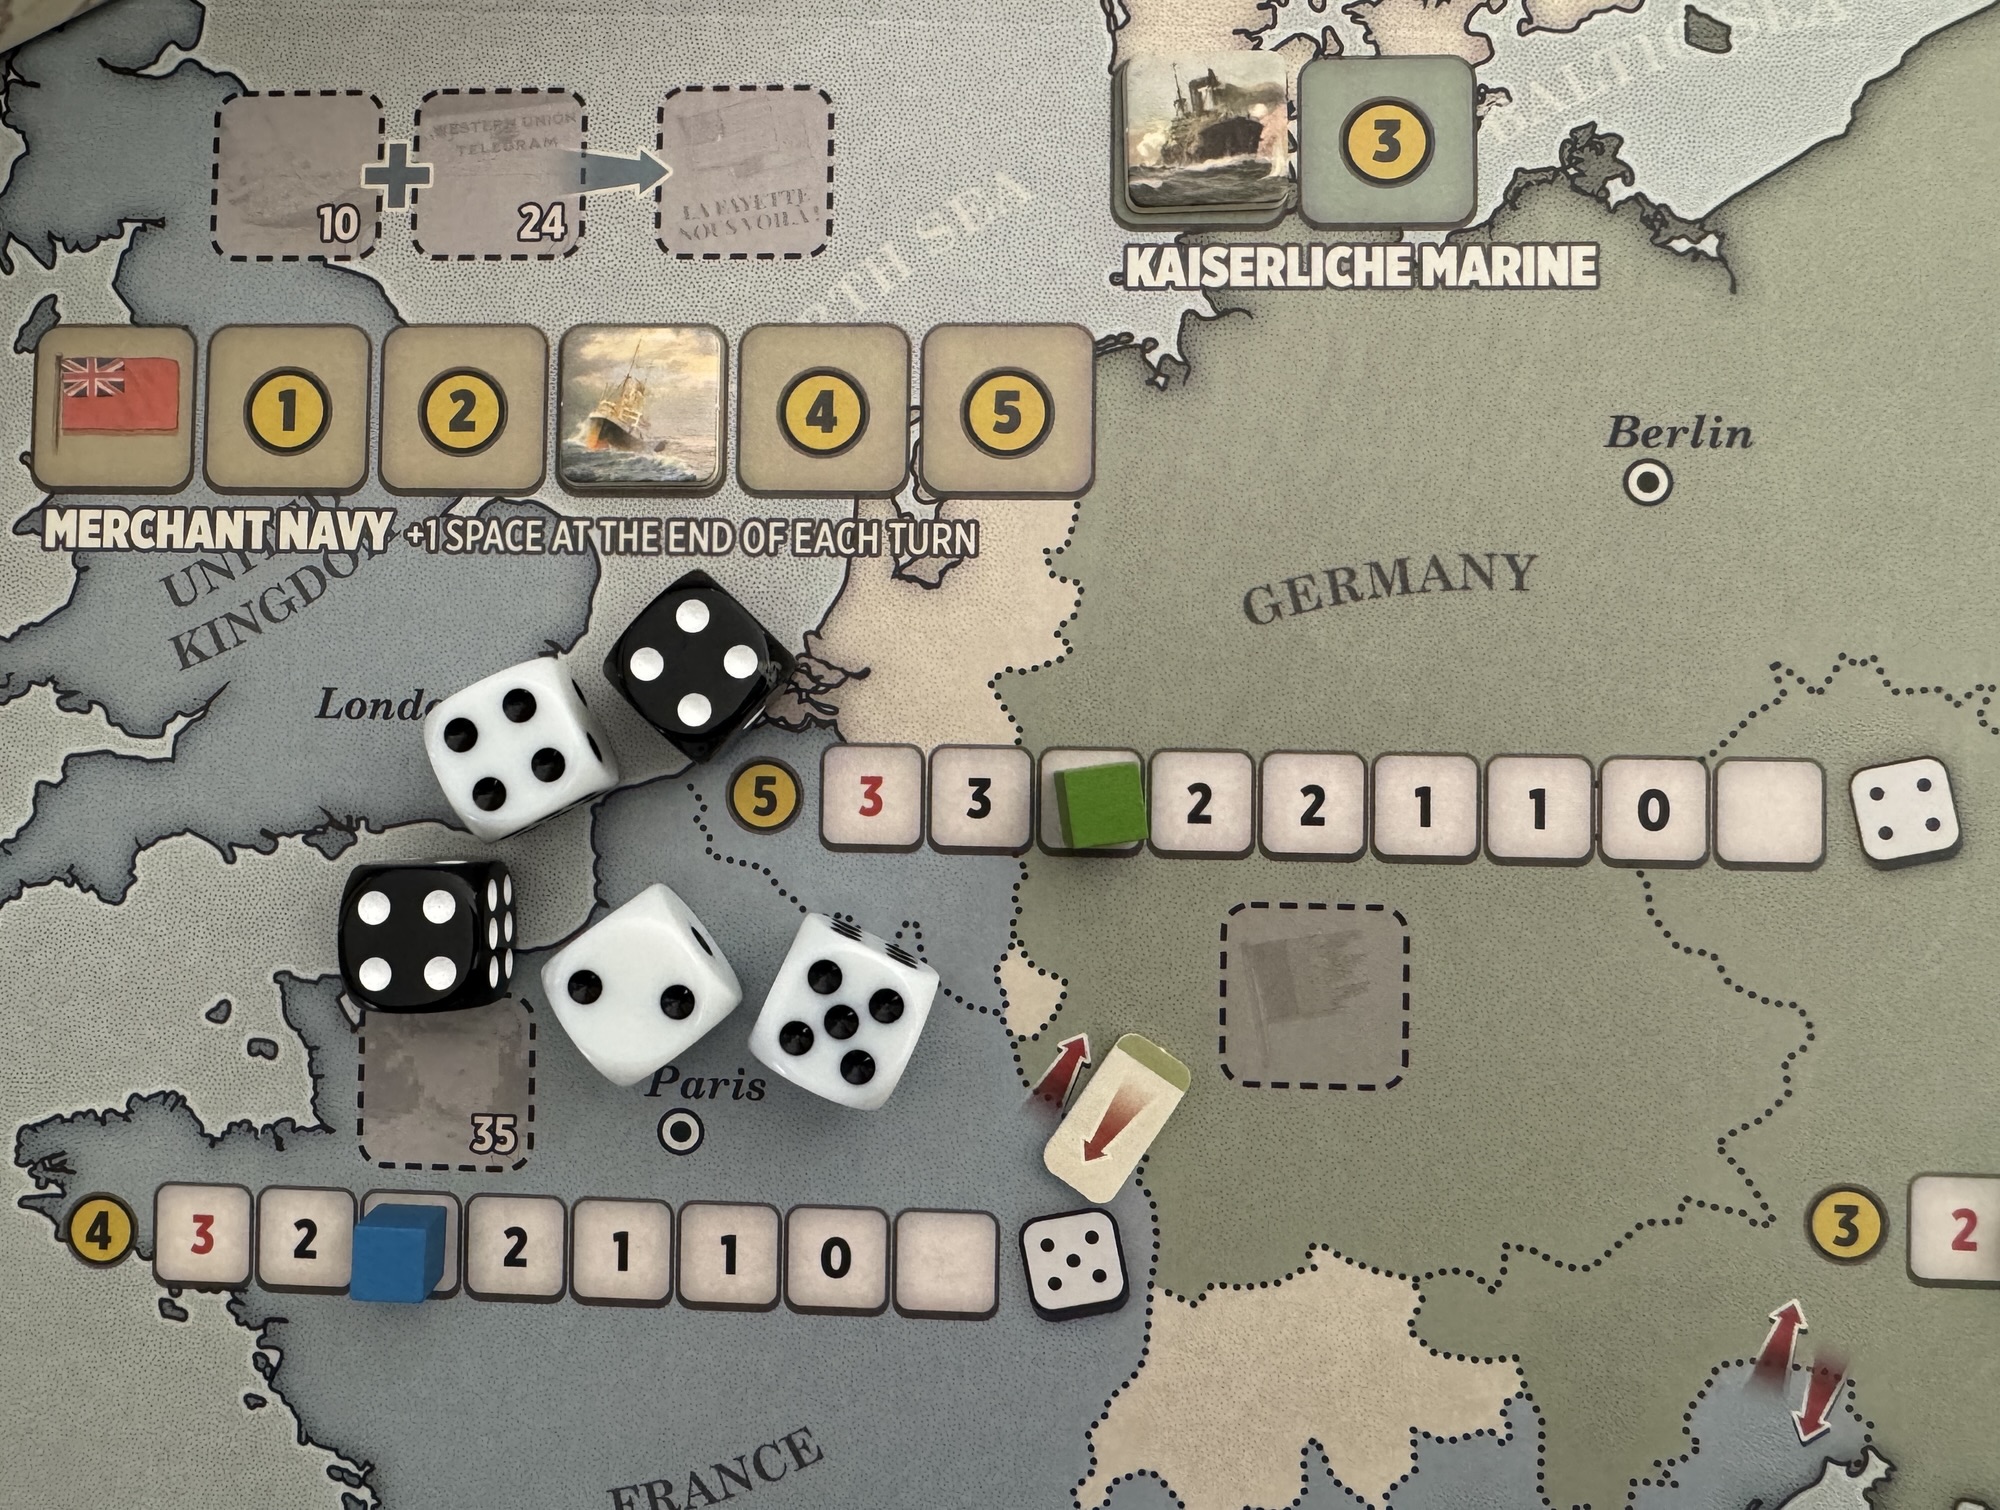
As we discussed in Action Point 1, shown on the board are the Offensive Arrows that will remind the players about what Offensives they can undertake, meaning what Sectors may be attacked, and what Sectors have already taken their one Offensive against that adjacent Sector per turn. These are identified by red arrows connecting adjacent Sectors and will be covered up by the appropriate Offensive Marker when undertaken. In the below picture, we will take a look at Serbia as an example. You can see that Serbia is surrounded by Central Power countries including Austria-Hungary and Bulgaria (Neutral at the start of the war). They also have a few of their Allied nations adjacent including Romania (Neutral at the start of the war) and Greece (Neutral at the start of the war). From each of the adjacent Sectors there are 2 Offensive Arrows represented meaning that this Sector can both be attacked and can attack the adjacent Sector.
The process of taking Offensives is really pretty simple as players take turns to activate one of their sectors that has not yet been activated this turn. The sector chosen will then be activated and must launch an Offensive against an adjacent enemy sector. There is a cost to the launching of Offensives though as the player will have to pay the appropriate cost by first choosing the size of their Offensive, which in game turns means the number of dice they will pay to roll in the Offensive. The size of the Offensive must be at least 1 and can be up to the current Operational Value of the attacking sector. The player launching the offensive then spends as many Resource Points as the size of the Offensive.
For example, The Entente player decides to attack Austria-Hungary from Russia. If Russia’s Operational Value is currently 2, the size of the Offensive must be between 1 and 2. If the Entente player chooses a size 2 Offensive they will have to spend 2 Resource Points. This would allow Russia to roll 2D6 along with any black dice for their Artillery Technology.
Once both of the players have activated a sector, each player may then continue with Offensives by choosing to activate a new sector until no new sectors can be activated. Each of the sectors can make but a single Offensive per turn. I really like this restriction as it reflects the logistical and material difficulties in planning, funding and executing these large Offensives. A player may always decide to pass rather than activate a sector but once you do pass the Resource Spending phase ends for them. The other player can continue to activate the sectors they want and are able to until they decide to pass on their turn or are no longer able to activate a sector.
Now let’s cover the mechanics of how the Offensive resolves with dice. The player will roll as many white dice as the size of the Offensive they funded. These dice are called Attack Dice and it is important to remember that some technologies allow modifiers to be added to Attack Dice or will grant additional dice to be rolled, usually in the form of Artillery Dice. Each level of Attack Technology implemented in the attacking sector grants a DRM (Die Roll Modifier) of +1 to each Attack Die roll. Each level of Defense Technology implemented in the targeted sector inflicts a Die Roll Modifier of -1 to each Attack Die roll. Each level of Artillery Technology implemented in the attacking sector allows the Attacker to roll 1 black Artillery Die. These dice are not subject to the bonuses/penalties conferred by either Attack or Defense Technologies. Also, keep in mind that the number of Artillery dice cannot exceed the size of the Offensive. This is a mistake that I have made many times in my plays of the game and wish there was a better way to remember this. In the case of Artillery Dice, if the player has developed the Aviation Technology, the attacker may re-roll as many Artillery Dice that failed to inflict a loss as the difference between their Aviation Level and the defender’s Aviation Level.
Each result greater than or equal to the attacking player’s Attack Value inflicts one loss on the defender. The Attack Value of a sector is represented by the die depicted at the end of the Collapse Track. Germany has the best value at a 4 while all other countries, with the exception of Greece who is a 6, have a 5. For each loss suffered in an Offensive, the defender moves the cube on the attacked sector’s Collapse Track by one space to the right. If a cube needs to be moved forward on the Collapse Track, but is already on the right-most space and can’t be moved forward, that country immediately surrenders. The Offensives process is really very simple, and it just fits with the chosen format and scale of the game. Nice and easy but fun with lots of dice rolling.
Counter Attacks
One more thing that I need to share about these Offensives is the concept of a Counter Attack. If at least one of the Attack Dice rolled comes up a natural 1, the attacker will suffer one loss and the cube in their own sector is moved forward one space on the Collapse Track. This is not one loss per 1 result but only 1 such loss with an Offensive. With my luck, I could lose my whole army and have to surrender! Also, remember that Artillery Dice are not affected by the Counter Attack rule.
The process of Offensives in La Der des Ders is very simple and straightforward but works very well in the framework of the game to create many tough choices about how to spend your limited Resource Points and who to attack and from where. As the Central Powers, attacking with Germany each turn makes the most sense as they have the best odds of scoring hits and causing losses to France and Russia but they will have to gauge where they stand and who else might be closer to Collapse and surrender. As the Entente, France and Russia should put a heavy focus on Germany and Austria-Hungary and force the Central Powers player to have to replace losses rather than spending on Technology upgrades and replacements. Continually attacking them will lead to results over the course of the game.
In Action Point 5, we will simply review the Victory Conditions.
With this My Favorite Wargame Cards Series, I hope to take a look at a specific card from the various wargames that I have played and share how it is used in the game. I am not a strategist and frankly I am not that good at games but I do understand how things should work and be used in games. With that being said, here is the next entry in this series.
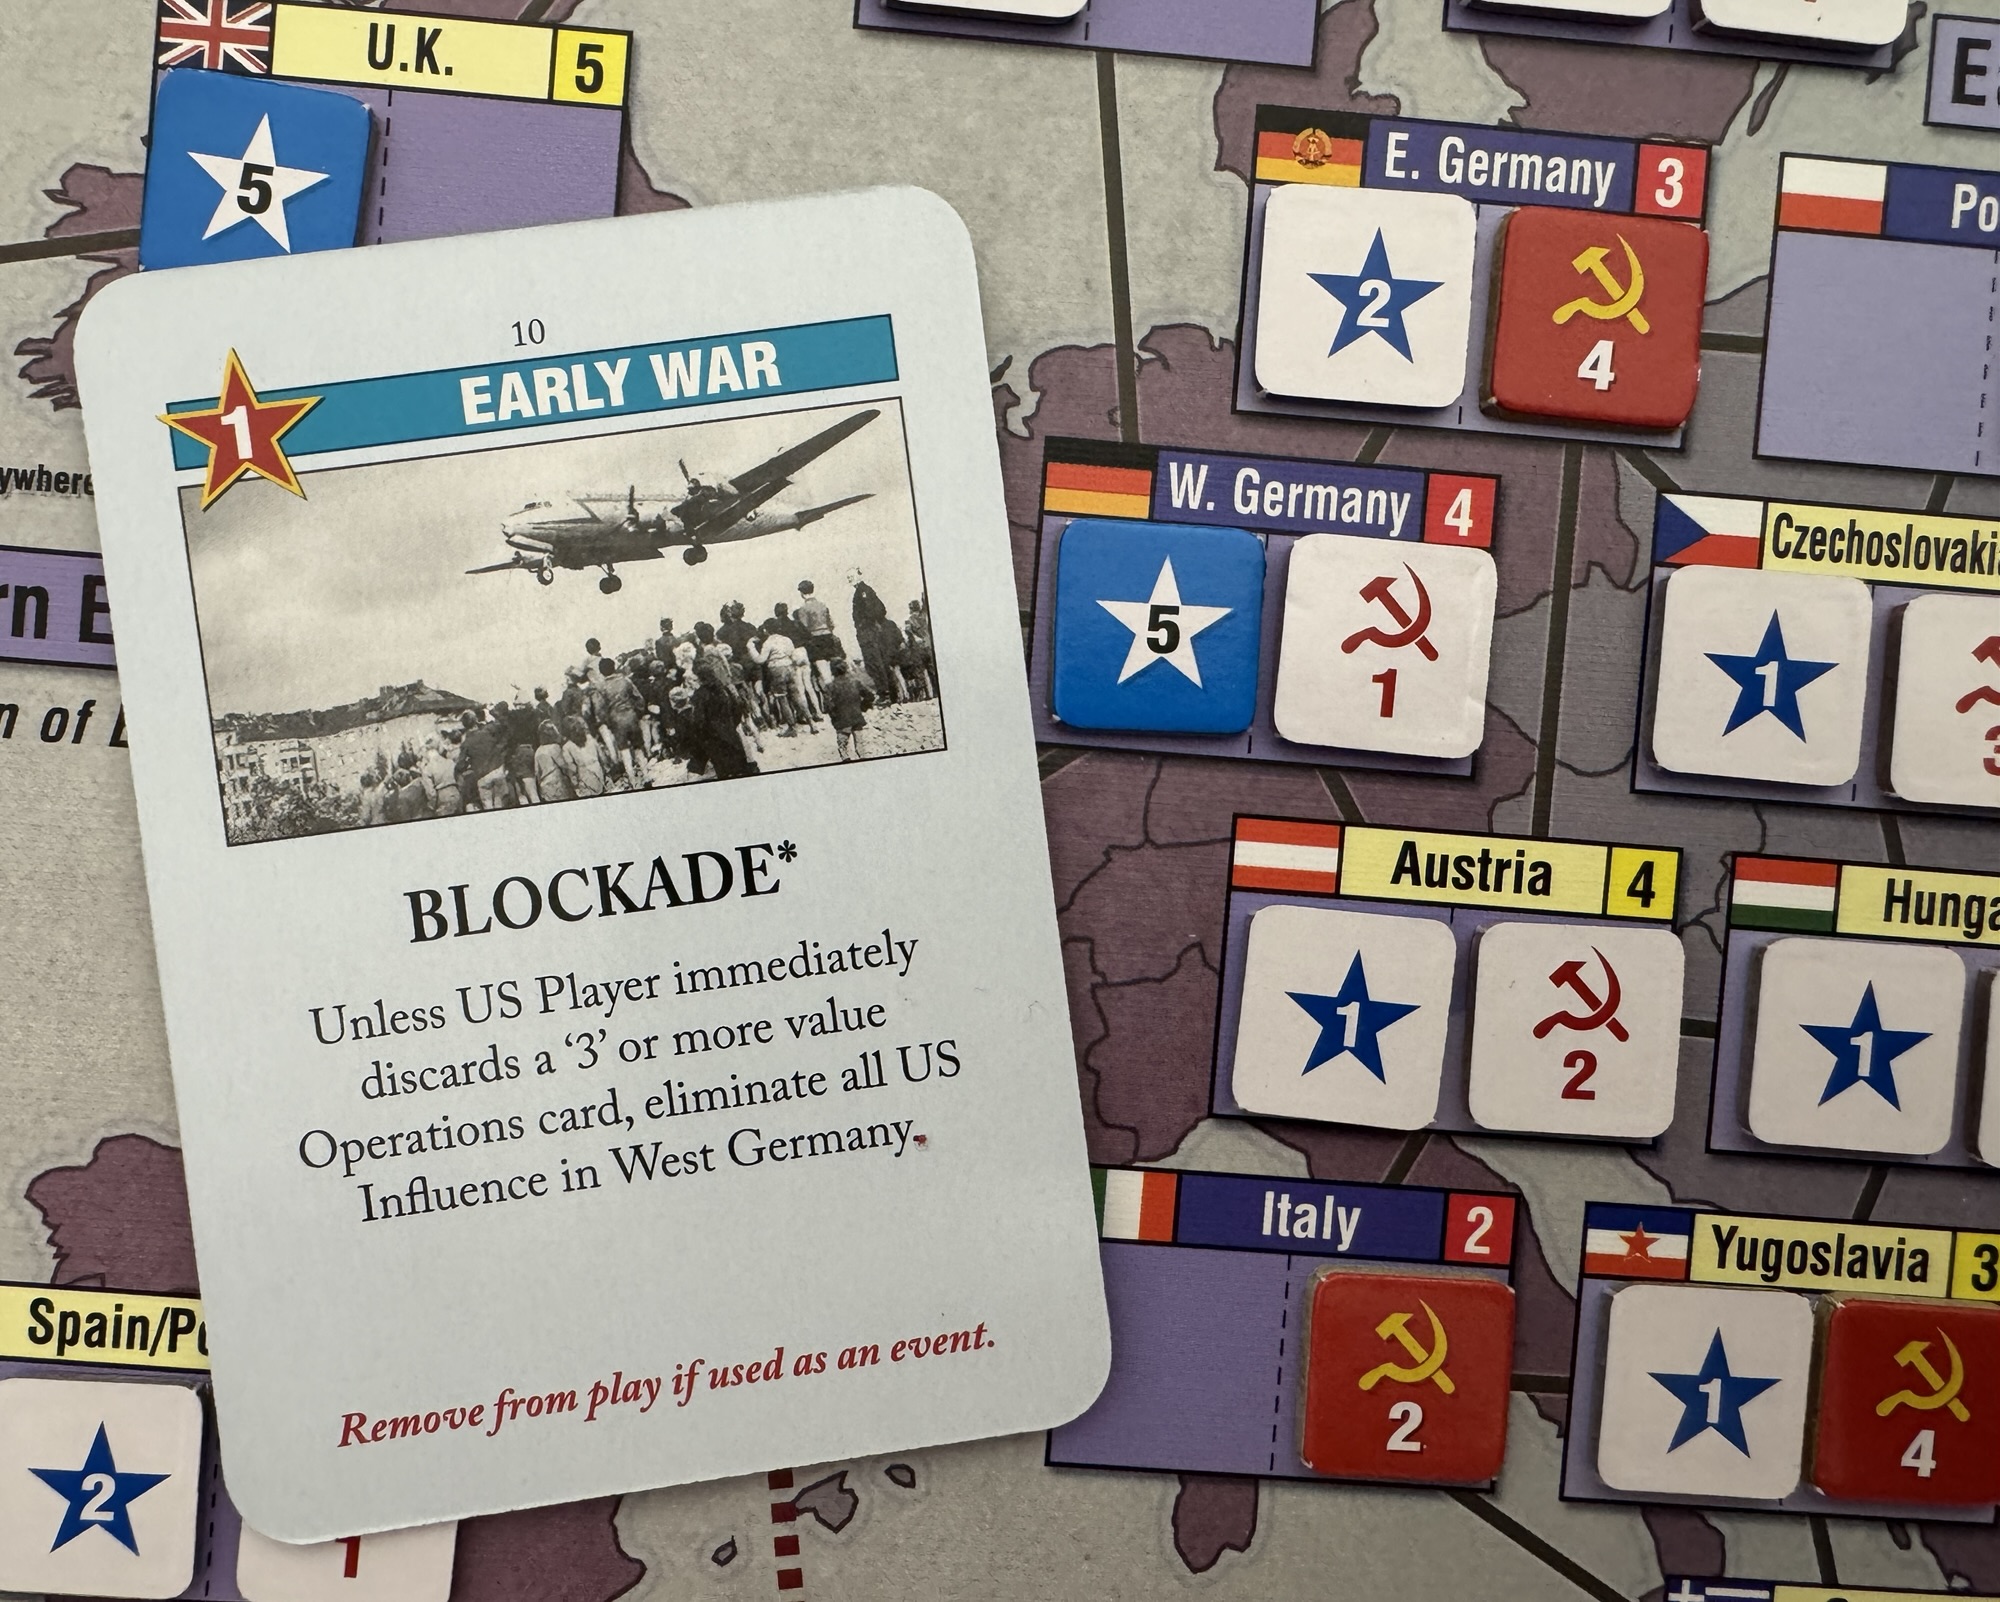
#69: Blockade from Twilight Struggle: The Cold War, 1945-1989 from GMT Games
Twilight Struggle is a 2-player game simulating the forty-five year ideological struggle known as the Cold War between the Soviet Union and the United States which can be played in 2-3 hours. The entire world is the stage on which these two countries “fight” to make the world safe for their own ideologies and way of life. The game starts right after the end of World War II in the midst of the ruins of Europe as the two new “superpowers” of the world squabble over what is left and ends in 1989, when only the United States remained standing.
The map is a world map of the period, where players move units and exert influence in attempts to gain allies and control for their superpower. The beauty of the CDG system used here is that each decision of whether to use a card for the event or the operations value is a struggle as if it is the other side’s event, it might go off hurting you very badly. There are mechanics to allow for the ignoring or cancelling of some of the best cards for your opponent in a side game within the game called The Space Race as well as nuclear tensions, with the possibility of game-ending global thermonuclear war (Shall we play a game, anyone?). I have played TS about 30 times and love it more and more with each sitting. The game makes me sweat, cringe, jump with joy and bite my fingernails. To me, a game that can do all of that in one sitting is worth the price.
One of my favorite type of cards from the game are those that force an action upon your opponent, such as discarding a card, reducing the Ops from card plays or causing them to have to make other plans than what they were working toward. These type of cards are more reactionary but definitely cause issues and mimic the various non-military focused strategies and tactics used during the Cold War. One of the most famous events from the early history of the Cold War is that of the Berlin Blockade. And there is a specific card that pays homage to the event in the game called Blockade. Blockade is an Early War Soviet Card that has an Ops Value of 1, which makes the card more valuable to be used for the printed event versus for the Ops.
When played, the card requires the US Player to immediately discard a 3 Ops or more value card from their hand or the consequence of not doing so will see all US Influence being removed from West Germany. This is a tough choice. Being early in the game, it is possible for the US to rebuild in West Germany and replace the lost influence over time if they do not wish to discard such as high value card. But, herein lies the real key to the Blockade cards use. The Soviet Player, who should be paying attention to not only their hand but also the card plays of the US Player, should try to use this card later in a turn once the US Player has played a majority of their cards in order to ensure that the event text can be realistically be achieved. If played quickly during a turn, the chances of the US Player being able to discard the required 3 Ops or great value card is higher and the card play will not generate any meaningful difference on the board state. I also would recommend a 2 card strategy here as the Soviet Player should be holding in their hand a high Ops card to be able to follow up this action with the placement of Influence into West Germany on their very next play. But, the real value to a card such as Blockade is that it forces the US Player to consider what cards are out there and to play around their negative effects as much as possible. Due to the nature of the game, and the randomness of card draws, having an expendable high Ops card ready and able to be discarded just in case of the play of Blockade is not really feasible. Also, remember that in Twilight Struggle that opponent events on cards that you play will go off and Blockade being drawn by the US Player can be bad as it will require them to play the event as you cannot discard a 1 Ops card to get rid of its negative effect in the Space Race Track due to the minimum requirement being a 2 Ops card. So the moral of the story here is that both players need to consider and plan for the play of or the mitigation of damage from Blockade.
The Berlin Blockade, which lasted from June 1948–May 1949, was a major Cold War crisis where the Soviet Union blocked all land and water access to West Berlin to attempt to force Western Allies out. The Soviet Union was taking this action as a means of retaliation against the introduction of the new Deutschmark currency. The US and Britain responded with the massive Berlin Airlift, flying over 2.3 million tons of food, fuel and supplies to the city. At the peak of the Airlift, a plane landed in West Berlin every 30 seconds. The blockade failed and the Soviets lifted it on May 12, 1949, after realizing the Allied Airlift could sustain the city for an extended period of time, marking a significant victory for the West in the ideological struggle. This event led to the acceleration of the division of Germany into East and West and the deepening of Cold War tensions.
Frederick the Great. A Military Life was published in 1985 by Routledge. It is a biography of Prussian king Frederick II (the Great, 1712—1786) dedicated to the military dimension of his life – not only his wars (on a tactical, operational, and strategic level), but also his activities as a military administrator and organizer.
Friedrich was published in 2004. Richard Sivél’s first published board game is a highly abstracted operational treatment of the Seven Years’ War in central Europe, focusing on Prussia’s desperate struggle for survival against the overwhelming odds of the Austrian-Russian-French alliance, personified by the eponymous king (Friedrich is the German form of Frederick). Five years later, a prequel on the War of the Austrian succession was published which uses the same basic system: Maria (Richard Sivél, Histogame).
Connections & Conclusions
My first contact with Duffy’s book was via Friedrich – it is one of the books referenced in the bibliography contained in the rulebook. A good choice, as it is the first treatment of the military dimension of Frederick’s life since imperial German times (and remains the definitive work on the subject until today).
Obviously, the book is more encompassing – after all, it treats not only the Seven Years’ War, but the entire 74-year life of Frederick. Yet the chapter on the Seven Years’ War makes up almost half of the book – testament to the importance of the war for Frederick (whom it turned from an energetic man in his prime into a hollowed out, aged king who had lost most of his pleasures along with many personal friends). The toll the war took on Frederick is showcased in many anecdotes both in the book and in the “small events” in the game.
Glum times for Frederick! Other event cards show him as energetic and decisive, but this one embodies his worst impulses.
Frederick represents a watershed in history. On the one hand, he expanded and modernized the Prussian bureaucracy which is so symbolic for the modern, often impersonal state. On the other, he was a roi-connétable, a king-warlord, one of the last monarchs to personally lead his troops into battle – those after him who did so had usually used their military success to also take political power which was then based on their continued martial prowess (like Napoleon). Yet in an age when the kings of Britain, France, or Russia remained at court and sent their generals to fight whichever war needed fighting, Frederick rode at the head of his main army, entrusting detachments to his generals only because he could not be everywhere at once.
And Frederick did his best to be everywhere. One of the most striking characteristics of Frederick’s campaigns is his masterful use of the interior lines, on which he performed sweeping forced marches from one theater of the war to another. The most impressive example is found late in the campaign of 1757: After Frederick’s offensive in Bohemia had failed, and France’s victory over the Hanoverian army in northwestern Germany opened the way for a French invasion of Prussia. Frederick marched his army to western Saxony, where he beat a combined French/Imperial army at Roßbach on November 5. The Austrians had used the opportunity to invade Silesia which had only been held by secondary Prussian detachments and were in the possession of almost the entire province… until Frederick’s army showed up, having marched 400 kilometers in a month, and expelled the Austrians from Silesia at Leuthen, the site of his greatest tactical victory.
Frederick’s forced march from Roßbach (battle on November 5, 1757) to Leuthen (December 5, 1757) on the Friedrich map.
These sweeping operational and tactical maneuvers are detailed by around 50 maps in Duffy’s book. Whoever is interested in the wars of Frederick will pore over them for a long time during the read and probably flick back and forth between the map section and the text to follow a battle description. While Friedrich prizes maneuver, it has to scale down the distances covered – the march from Roßbach to Leuthen would take five turns on the map (an entire game typically takes around 20 turns).
Operational map of the forced march from Roßbach to Leuthen (top) and tactical map of the battle of Roßbach (bottom right) in Frederick the Great. A Military Life. I’d love to say the book is in this slightly banged up condition because I read it so often, but the unromantic fact is that I bought it used at a library sale (at the bargain price of four bucks).
Thus, there is a certain disconnect between general Friedrich [the pieces are all named in the German fashion] moving on the map and the player role of Frederick: The general Friedrich is much less important than the historical Frederick-the-general. His piece starts in Saxony, which makes it likely that he will only ever do battle with Austria and their minor ally, the Imperial Army, but never venture far enough to fight against France or even Russia and its ally Sweden. If he remains in Saxony and Prussia elects to focus its defense against Austria in Silesia, Frederick might command only a small detachment, avoiding battle while pinning down Austrian forces and taking unglamorous retreats if he is engaged.
Friedrich (Frederick) is keeping Karl von Lothringen (Charles Alexander of Lorraine) busy in Saxony while the main forces of Prussia and Austria, stacked to impressive height, face off in Silesia.
The player role of Frederick, however, oversees the entirety of the Prussian war effort (as well as that of Prussia’s minor ally Hanover, ruled in personal union by the king of Britain). The player has control over the maneuver of their generals of which Frederick could only have dreamt: News of a victory or defeat in East Prussia would have reached his army camp in Bohemia only weeks after the event, whereas in Friedrich the player can position the general in charge of defending East Prussia exactly where they want and have him surrender, retreat, or fight for his life according to the overall strategic plan.
Maximilian Ulysses von Browne has moved boldly in the first turn… and might face Friedrich/Frederick’s wrath (and superior power) in the second.
Nonetheless, the game is very effective at conveying Friedrich’s psychological state: In the early game, the player might be elated by their power and success. As Frederick moves and draws cards first in the round, an aggressive player can attack their foes with overwhelming force – for example, a second-round attack on Austria means that Prussia has drawn its seven cards per round twice already (so, fourteen in total), whereas Austria has only drawn its five cards per turn once. This corresponds with the quality advantage of the Prussian troops early in the war which Duffy notes frequently. Yet Duffy also argues that this advantage was lost by the heavy casualties the Prussian army endured in 1757 and would never be regained. (Duffy contends that Frederick inherited the finest military force in Europe upon his accession to the throne, but left his own successor a mediocre army – this long-term criticism of Frederick is, of course, beyond the scope of the game.)
Correspondingly, the Frederick player will soon find that the time to play defense has come (if it hasn’t been from the beginning of the game). And as their once-impressive card hand dwindles under the repeated attacks from all foes, elation will give way to gloom. Whenever an anecdote is read as the end-of-round event, showing the historical Frederick at turns defiant, melancholy, or self-pitying, the Frederick player will be able to relate – as they will as Austria’s allies, one after another, falter and peace is made. Frederick might have won the game, but it will surely have taken a toll.
Prussia barely holds on to the last Austrian and Russian objectives… let’s hope for Frederick that the Tsarina dies soon!
In that sense, Frederick the Great. A Military Life and Friedrich are a perfect match – the analytic and the immersive, the intellectual and the emotional. Give both a try!
Three years ago, I have inaugurated a new irregular series on my blog assessing the merits of UK prime ministers (illustrated through the lens of a single board game each). The rating system seemed robust enough to apply it to other countries/leaders (at least if they are more or less democratic). Thus, we branched out to American presidents and German chancellors. Today’s subject is the rare German president with political power – Paul von Hindenburg, the second and last president of the Weimar Republic. And which game could be more appropriate for him than Weimar (Matthias Cramer, Capstone Games/Skellig Games/Spielworxx)?
The Rating System
Some caveats ahead: The presidents will be rated by the knowledge of their time. If they or their contemporaries could not have known about the effects of something, I will not use my hindsight to mark it as a mistake of theirs. The assessment is focused on their conduct as president.
Now, to the system itself: There are three policy field categories (foreign, domestic, and economic policy) and three more general ones (vision, pragmatism, integrity). A president can earn from one to five stars in each category (for a total sum of up to 30). In detail, the president is assessed as follows:
Foreign policy: Did the president increase German influence in the world and the security of Germans at home? Did the president wield German power responsibly and with positive results for the regions affected?
Domestic policy: Did the president increase the liberty of Germans to express themselves and to participate in the political process? Did the president promote domestic security and shape the framework for fair justice dealing with offenses?
Economic policy: Did the president facilitate the prosperity and economic security of Germans (including in the mid- and long-term)? Was the president’s economic policy based on mutual benefit of those involved or did it unduly burden one side?
Vision: Did the president have an idea of what Germany and Europe (the latter counting for more in times of German influence being great) should look like beyond the immediate future? Did the president’s policies steer Germany (and, if applicable, Europe) in this direction?
Pragmatism: Did the president succeed in seeing their policy through from inception to completion? How well did the president manage the support from parliament, society, the administration, the media?
Integrity: Did the president understand the office as a means to benefit themselves, special interest groups, the entire country, or another community? Did the president respect the boundaries of the office?
Note: If you have read my UK prime minister or US president ratings, you will remember that I rated them on the global impacts of their vision as well. As the rating system is only really applicable to democratic leaders and no democratic German leader ever had the chance to conduct a truly global policy, I only assess their vision on national and European grounds.
In all other ratings (UK prime ministers, US presidents, German chancellors) the subject’s life after holding the office is also assessed (for they are still seen as ex-office holders, but as a secondary consideration). This does not apply here, as – spoiler! – both Weimar Republic presidents died in office.
Hindenburg’s Life
Paul von Beneckendorff und Hindenburg was born in 1847, when Prussia was still an absolute monarchy. Like most men in his family, he opted for a military career and had his baptism of fire in Prussia’s wars of unification: He fought at Königgrätz (Sadowa) against the Austrians at age 18, at Sedan against the French three years later. The socialist Paris Commune which had been formed against both the Prussian siege of Paris and the liberal French government filled him with a horror of civil war and revolution which would influence him all his life. Back from the wars, Hindenburg enjoyed a successful career as an officer, culminating in his promotion to (full) general in 1905. In the forty years between the victory over France in 1871 and his retirement (aged 63) in 1911 he would not fight another war.
Hindenburg was recalled into active service shortly after the outbreak of World War I and placed at the head of the 8th Army, the only German force dealing with Russia’s invasion of East Prussia. At the advice of his energetic chief of staff Erich Ludendorff, Hindenburg opted for a daring counter-attack which annihilated one of the two Russian invasion armies. The actual execution of the plan was left to Ludendorff. Hindenburg’s main contribution was to remain steadfast when Ludendorff wanted to abandon the plan in the middle of the operation during one of his nervous fits – a pattern which would become characteristic for the rest of the war. Hindenburg and Ludendorff had won the most significant German victory of the early weeks of the war, and they had done so on German soil. The fundament for the myth of Hindenburg was in place.
While Hindenburg, now the commander-in-chief of the German forces on the Eastern Front, had suddenly become the most admired and revered German, the ambitious Ludendorff also urged him to demand greater influence over the course of the entire war. That embroiled the duo Hindenburg-Ludendorff in a continued rivalry with the OHL (Oberste Heeresleitung, Supreme Army Command) under Erich von Falkenhayn. Hindenburg, brought up with the values of a Prussian officer, was now routinely insubordinate to his military superior Falkenhayn, until Emperor Wilhelm II sacked Falkenhayn in August 1916 and replaced him with Hindenburg. Of course, it was once more Ludendorff, who (now as First Quartermaster General) pulled the strings.
Hindenburg and Ludendorff widely sidelined the emperor and ran Germany as a quasi-military dictatorship. However, their double role of political and military decision-makers did not come with increased effectiveness: What the politicians Hindenburg and Ludendorff demanded (a victorious peace, vast annexations, a German hegemony over Europe), the generals Hindenburg and Ludendorff could not deliver. And while the military leadership of the German armies remained strong, the political decisions lacked judgment – unlimited submarine warfare drew the United States into the conflict on the Allied side in 1917; the mishandling of relations with post-revolutionary Russia tied down German forces in the east. Hindenburg and Ludendorff gambled on a last offensive in the west in 1918 – and lost. The reserves were spent now. As the Allied armies pressed forward in a counter-offensive, making peace seemed like the best option to Germany’s military dictators.
They applied to US President Woodrow Wilson for peace – in the hope that a lenient peace based on the Fourteen Points could be obtained. Wilson, however, remained firm: On the one hand, he insisted on parliamentary government for Germany (and thus the end of the OHL dictatorship); on the other, the territorial losses and military restrictions to be applied to Germany seemed dishonorable to Hindenburg and Ludendorff. One way or the other, their desire to remain responsible for the country waned – they complained in bitter terms how they had been “stabbed in the back” by a non-supportive home front. In the end, Ludendorff resigned, but Hindenburg stayed on as the head of the OHL – but complemented with a chancellor whose power base was the German parliament. Their attempt to save the German monarchy with an orderly transition out of the war was quickly swept away by the revolting masses in the revolution of November 1918.
Now Hindenburg showed remarkable pragmatism. While the revolution was made by the Social Democrats, pariahs under the monarchy to which Hindenburg was so attached, his dislike for them was outweighed by his horror of civil war. Together with Ludendorff’s successor, general Wilhelm Groener, he placed the German army at the disposal of the new government led by Social Democrat Friedrich Ebert… with the understanding that it would be used to quell any Bolshevik unrest. The (Majority) Social Democrats thus were able to complement their political dominance over the more left-leaning Independent Social Democrats with the hard power of the army and usher in a parliamentary republic.
The pact between Ebert and Groener allowed them to put down socialist revolutionaries. Note that the game event (which is a SPD card) could also be used against a right wing uprising!
As with Ludendorff, Hindenburg let Groener fill the active role in their partnership while providing the myth surrounding his person. Groener and he made sure that the army, still spread out from France to Ukraine, returned in an orderly fashion. When the Treaty of Versailles was offered to the German government, Hindenburg personally understood that there was no alternative to it – Germany could not have renewed the war with the Allies. As he felt the Treaty was humiliating, though, he left it to Groener to advise the government to accept.
The “stab-in-the-back myth” contributed to the re-legitimation of the German right wing after World War I.
Once the Treaty was signed, Hindenburg retired to private life, but remained immensely popular, a beacon of the anti-republican Germany. When he stated at the parliamentary committee of inquiry dealing with the end of the war that the German army, “undefeated in the field” had been “stabbed in the back,” (by whom exactly, he did not specify – listeners felt free to fill in the blank with their preferred choice of enemy, usually “the Jews” or “the Socialists”) it gave the myth a quasi-official sanctioning.
His relationship with the German right, however, was rather complicated. Hindenburg was close with some members of the DNVP (Deutschnationale Volkspartei – German National People’s Party), but never became a party member. He did join the ideologically similarly inclined Stahlhelm (Steel Helmet) association of former soldiers, though. He condemned both major right-wing coup attempts of the early Weimar Republic – reluctantly in the case of Kapp and Lüttwitz, forcefully in the case of his former partner Ludendorff with the upstart demagogue Adolf Hitler.
When president Friedrich Ebert died in 1925, lesser men had to fill his shoes. None of the various candidates running in the first round of the presidential election came close to a majority by themselves. Coalition building was the order of the day now. The pillars of the republican order (Social Democrats, (Catholic) Center, and left-leaning Liberals) would put the Center candidate Wilhelm Marx forward as a joint candidate. While the right-leaning Liberal candidate Karl Jarres had received the most votes in the first round, the parties of the right feared that he would not be able to stand against a united republican camp. The constitution, however, allowed for candidates to be entered in the second round who had not been running in the first. And which candidate would, on merit of his personality, have a better chance than the old war hero, the victor of Tannenberg?
Hindenburg electrified a certain part of the electorate. Others criticized his closeness to the old monarchy (Hindenburg had sought approval from the exiled Wilhelm II before running, but denied this), his lack of experience with parliamentary politics, and his age (he was 77 already, and would be 84 by the end of his term). Hindenburg was elected in the second round with a plurality of the votes.
Hindenburg has the best chances to be elected president in Weimar – and will give the slow-starting DNVP a great boost when in office.
The election of a Reichspräsident is one of the turning points in a game of Weimar: The winner receives the very powerful Reichspräsident card which allows the player to use one of their cards twice every turn. As you only hold five cards each turn, being president thus guarantees you to be 20% more effective! In the game, Hindenburg acts as the candidate for the DNVP (which is an amalgam of various nationalist groups extending beyond the DNVP proper). His chances to win are typically pretty good, as the DNVP has many opportunities to place more party bases early in the game… and, as the DNVP typically does not score a lot of points in the early game, other players might also be more likely to cast their votes for Hindenburg in the second round of the election.
Early in his term, Hindenburg surprised many of his critics: Despite his background, he kept within the confines of the republican constitution (and declared publicly that he did not seek a return to monarchy), despite his inexperience, he immediately found a role in the political process (for example, it was his stern intervention that brought the quarrelling parties to form a government in 1926), and despite his age, he did not seem to lack vigor.
Hindenburg even showed his trademark pragmatism: When Hans von Seeckt, the chief of the German army, invited a Prussian prince to an army exercise, Hindenburg promptly sacked him to avoid tensions with the Allies. And when the Social Democrats won the 1928 parliamentary elections and formed a “grand coalition” government with the Center and the Liberals, Hindenburg worked well with them.
Yet his old networks persisted, and in the eyes of the monarchists, the military men, the aristocratic magnates of the old Prussia, it was clear that the Social Democrats, no, the whole parliamentary system needed to go. As Hindenburg grew older and relied more on his advisers (chief of them his son Oskar and Kurt von Schleicher from the Army Ministry), his attachment to the parliamentary, constitutional system lessened. When the Social Democratic Chancellor Hermann Müller opposed an agricultural aid package from which the aristocratic magnates would benefit most, Hindenburg decided it was time for a change in government. Together with Oskar and Schleicher, he sounded out the parties on the political right to form a minority government which would not act through parliament, but through presidential emergency decrees. They were intrigued.
The last Weimar Republic government which had a parliamentary majority broke apart in 1930 – ostensibly over a rather minor disagreement regarding the budget for unemployment insurance (by then, Germany was in the throes of the Great Depression). The schemers behind the scenes quickly put up a new minority government led by Heinrich Brüning from the right wing of the Center. Brüning would spend the next two ears trying to combat the crisis with a deflationary policy exacerbating the economic woes of the country. The Social Democrats opposed Brüning and, when he couldn’t get a majority for his budget, forced new elections in September 1930. Neither they nor the government succeeded at the polls, though – instead, the Nazi Party leaped from a fringe group to the second-strongest force in parliament (behind the Social Democrats). Brüning continued his minority government based on presidential executive orders.
Hindenburg and Schleicher regarded the Brüning experiment with ever less enthusiasm, and sought to push the government to the right – but they could not find the partners for such an enterprise yet: The DNVP refused to join the government coalition, and Hindenburg dismissed the Nazi Party because of his assessment of Hitler as too vulgar (understandable) and socialist (confusing his positions with those of the “national revolutionaries” in the Nazi Party). Hindenburg even gave in to Brüning’s and Groener’s (now Army Minister) pressure to outlaw the SS and SA Nazi paramilitary forces to stop the ever-increasing political violence in the streets.
After the seven years of his first term ended, Hindenburg, now aged 84, stood for re-election 1932. His main opponent would be Hitler. The parties who had supported Marx in his failed bid of 1925 had no candidate who could match the charisma of the other two – and so the left-leaning and centrist democratic parties rallied around Hindenburg. One would suppose that this would ensure a blowout victory – yet most of Hindenburg’s old supporters on the political right, concentrated in the rural, Protestant areas of Germany, defected to Hitler. Hindenburg won 53% of the vote in the second round and remained president.
Schleicher then pushed for a new, entirely non-parliamentary government, and when Brüning proposed a plan to settle derelict agricultural land in the east with the unemployed (to the detriment of the aristocratic owners), Hindenburg agreed that it was time for change. He dismissed Brüning, and, advised by Schleicher, appointed Franz von Papen (no party affiliation) chancellor. Papen was to govern with a cabinet of aristocrats which had no parliamentary basis whatsoever – the Cabinet of Barons.
Papen and Schleicher both courted the Nazis, but disagreed on the methods: Schleicher wanted to split the Nazis by allying with its “national revolutionary” wing; Papen (supported by Hindenburg) lifted the ban on SS and SA, ostensibly to decrease political tensions. The opposite happened: Nazi paramilitaries started a riot with Communist supporters in the working-class Hamburg suburb of Altona in which several people were killed. The fear of political violence provided a pretext for forceful government action: When there was no government majority after the state elections in Prussia, Hindenburg authorized Papen by executive order to depose the acting state government of the democratic parties (an open breach of the constitution).
Papen, however, had maneuvered himself into a dead end. His attempt of governing detached from parliament ignored the political will of the German people: Some of them might prefer the Nazis, others the Social Democrats, the Communists, or the Center – but barely anyone supported Papen, as the parliamentary election of November 1932 showed. Hindenburg sounded out all parties from the Nazis to the Liberals (but not the Social Democrats or the Communists), but failed to find a workable government.
Another solution had to be found. Schleicher convinced Hindenburg to sack Papen and took over as chancellor himself. His attempt to form a cross-ideological front of the army, the trade unions, and the “national revolutionary” Nazis made the established elites uneasy. Papen took his revenge by agreeing with Hitler on a coalition government – headed by Hitler, but with only a few Nazi ministers. Papen convinced Hindenburg that this was the way to tame the Nazis: Use their popular support while demystifying them as they got bogged down in the minutiae of government. On January 30, 1933, Hindenburg swore Hitler in as chancellor.
In Weimar, Nazi parliamentary rule would end the game – with all players losing. Hindenburg, playing with people of flesh and blood, rather than with wooden meeples, also seemed defeated after the Nazi takeover. He ceased resistance to Hitler and stood by him at the old church of the Potsdam Garrison in a symbolic merger of the old and the new national movement. In the meantime, the Nazis dismantled the democratic order. Paul von Hindenburg died on August 2, 1934. No new president was elected. Instead, Hitler acted as joint head of state and government – Führer und Reichskanzler.
The Rating
Foreign Policy
Hindenburg generally supported the government position on foreign policy, which aimed at shedding the restrictions of the Versailles Treaty and re-admittance of Germany as a fully equal great power. He did misjudge at times how to achieve these goals – for example, he thought that the League of Nations would put additional shackles on Germany (unlike foreign minister Stresemann, who realized the League’s potential to adjudicate conflicts which were before handled directly between Germany and the Allies).
Hindenburg was not particularly interested in domestic policy and left it largely to the chancellors and their ministers. Whenever he did get involved, however, it was to detriment of the freedom of the German people: His initial refusal to outlaw SS and SA contributed to the rise of political violence, as did his speedy cancellation of the ban after only three months. The subsequent Strike on Prussia was the most obscene breach of the constitution before the Nazis dismantled it altogether – without encountering resistance from Hindenburg, whose credibility with the military, administrative, and business elites might have prevented their walkover.
Once more, Hindenburg largely went along with the policies of his chancellors. In the case of Brüning’s attempt to combat the recession with the tightening of spending, that was catastrophic. Whenever Hindenburg attempted to leave his own mark, it was in favor propping up the failing system of East Elbian agriculture in a lucrative way for the old aristocratic elites.
What did Hindenburg eventually want? – He favored monarchy over republic, but did not seek a return to it in office. He swore an oath to the constitution, but treated it ever more casually the longer he ruled. His preferences for governing with, against, or beside parliament shifted according to his chancellors and advisors. He attempted to include or exclude the Nazis at times, and eventually was swallowed by them.
Hindenburg started strong in this regard: He was instrumental in the formation of governments and got along well with parties as different as the Social Democrats and the German National People’s Party. He also got his way in the change of governments from 1930 on (even though a good deal of this was conceived rather by his son and Schleicher). Yet these tactical strokes did not lead to strategic gains, and in the end, Hindenburg outmaneuvered himself with the Nazi-led coalition government.
Hindenburg attached great importance to be regarded as above the parties, as a representative of all Germans. Yet in practice, he played favorites, most notably in his economic policy which was shaped by his close connection with the East Elbian agricultural magnates. Hindenburg could also be petty, as when he refused to visit the Rhineland and Westphalia in 1930 because the Stahlhelm had been outlawed there for their breaches of the Versailles Treaty. On a grander scale, Hindenburg tested the limits of the constitution from 1930 on with his various non-parliamentary governments… and in the end, attacked the constitution frontally in the Strike on Prussia.
Overall: Hindenburg played a complex role in the Weimar Republic. While his age and his tendency to let others plot the course of action excuse him from some of the blame, he crucially contributed to the extension of the economic woes and political violence which engulfed the republic, and directly aided the steady erosion of parliamentary rule from 1930 on. Hindenburg enters the list at the very bottom.
How would you rate Hindenburg? Let me know in the comments!
Further Reading
Hindenburg has found surprisingly little attention in recent English-language scholarship. The standard scholarly biography in German is Pyta, Wolfram: Hindenburg. Herrschaft zwischen Hohenzollern und Hitler [Hindenburg. Rule between the Hohenzollern and Hitler], Siedler, Munich 2007.
A shorter, more accessible treatment is Rauscher, Walter: Hindenburg. Feldmarschall und Reichspräsident [Hindenburg. Field Marshal and Reich President], Ueberreuter, Vienna 1997.
For the broader context, see: Herbert, Ulrich: Herbert, Ulrich: A History of Twentieth-Century Germany, Oxford University Press, Oxford 2019.